Remove DNS Unlocker version 1.3 (Virus Removal Tutorial)
DNS Unlocker version 1.3 Removal Guide
Description of DNS Unlocker version 1.3
What is new about DNS Unlocker 1.3 virus?
If you are at least a little interested in the latest cyber security news, you must have heard about the DNS Unlocker 1.3 virus. If this name sounds unfamiliar to you, we are glad to be the firsts to inform you about the dangers of this possibly malicious application. DNS Unlocker 1.3 is an improved version of the original DNS Unlocker adware, which is initially promoted as a useful tool, helping the users to display websites which are limited to some particular countries only. It works by modifying the computer’s location settings to imitate that it is located in a specific country, required to view the website. Even though this application may not be technically a virus, it definitely possesses some attributable traits. Because after all, the security experts have deemed this application as potentially unwanted for a reason. As soon as you notice this virus or any other suspicious activity on your computer, do not hesitate and scan your system with a sophisticated anti-malware tool, such asFortectIntego.
First and foremost, it should be emphasized that Unlocker 1.3 infiltrates the user’s computers stealthily, without asking any approval from the computer user. It is unlikely any of your regular programs would behave in such a manner. Secondly, the virus generates multiple intrusive ads, which may randomly appear on any of your visited sites and interrupt your browsing. Finally, it gathers and stores information regarding your browsing habits. The processes this application runs on the computers indeed sound worrying, so we understand if you want to skip this article and remove DNS Unlocker 1.3 from your computer immediately. Nevertheless, if you are still undecided about the virus removal, or simply want to find out more about the consequences of DNS Unlocker 1.3 hijack, we invite you to continue reading this article. We provide a more in-depth look into the processes this virus carries out in the hijacked computers:
Computer infiltration:
DNS Unlocker 1.3 can infiltrate the majority of Windows operational systems. Windows 7, 8, 10, XP and other versions are not safe from this virus. Once the PC is infected, all of its browsers, including Google Chrome, Mozilla Firefox, and Internet Explorer will be affected, so, switching from one infected browser to another will be of no help if you are infected with this virus. The virus installs as a browser add-on which allows it to generate and inject ads into the browsing results. Also, with the help of this virus, other potentially hazardous programs, for instance, browser hijackers, can sneak into your system more easily.
Ad generating:
One of the major features DNS Unlocker is known for is the injection of a variety of different ads into the browsing results. The users of infected computers report that the ads are extremely annoying and intrusive. They are based on a virtual layer, which allows the ads to pop-up in front of the original page content. The DNS Unlocker 1.3 ads may also come in different forms, including pop-up ads, banners, in-text ads, and even video ads. The ads usually appear on every page you visit, regardless of whether you want to see them or not. Advertising third-party websites in their ads bring profit to the adware developers, so they will do their best to generate as much as of them possible. DNS Unlocker 1.3 redirect issue is another of the many problems addressed by the disappointed users. However, if you think about it, it is rather predictable that the adware creators will generate ads ensuring maximum user engagement, even if that means they will not disclose their actual purpose.
Data tracking:
The security experts claim to have proof that DNS Unlocker 1.3 adware tracks the infiltrated computer. It specifically targets the users’ browsing habits, such as what sites they visit most frequently, what pages they view, what information is entered into the search engines. This collected data assists adware creators in generating more particular, user-oriented advertisements. Also, you cannot be certain if the gathered data will not be shared with the some untrusted third-parties.

How can this virus hijack my computer?
DNS Unlocker 1.3 just like its original version and other adware programs, is distributed via the infected software packages. These kits consist of some popular programs bundled with this PUP. Using the initially downloaded program’s installation setup as camouflage, DNS Unlocker 1.3 stealthily installs on the computer. Its activities will be initiated the next time you reboot your computer. To prevent this program from entering the system, you should follow these basic steps:
Change your browsing habits: avoid visiting suspicious websites, download your software only from reliable sources, do not click on different ads and notifications you see in your browser, especially if they are suggesting software updates or some unrealistic commercial offers.
Follow all of the newly downloaded software’s installation steps: always read through the ‘Terms of Agreement’ or any other documents added to the software you are about to install. Also, always opt for the ‘Advanced’ or ‘Custom’ installation settings to be able to manage optional installs. Avoid ‘Quick’ or ‘Recommended’ installation modes since they do not disclose the full information about the contents of the software package.
Finally, equip your system with sophisticated antivirus utilities.
DNS Unlocker 1.3 removal suggestions:
Removing this virus from your computer may not be the easiest task, but it is possible. You simply have to know the right techniques to do it. The security experts always suggest removing the virus with some trustworthy antivirus tools. However, the Internet is also full of people trying to find ways to remove DNS Unlocker 1.3 manually. We have to warn you that trying to eliminate this virus from your computer without proper instructions can lead to the virus falling back to your browser. Therefore, our team of experts have analysed the virus and came up with optimal and most efficient DNS Unlocker 1.3 removal instructions. You can find the whole step-by-step removal guide just below the article. If you decide to opt for the automatic virus removal make sure you update your virus-fighting utility tool to its latest version.
You may remove virus damage with a help of FortectIntego. SpyHunter 5Combo Cleaner and Malwarebytes are recommended to detect potentially unwanted programs and viruses with all their files and registry entries that are related to them.
Getting rid of DNS Unlocker version 1.3. Follow these steps
Uninstall DNS Unlocker version 1.3 in Windows systems
Terminate suspicious programs from Windows 10/8 machines by following these instructions:
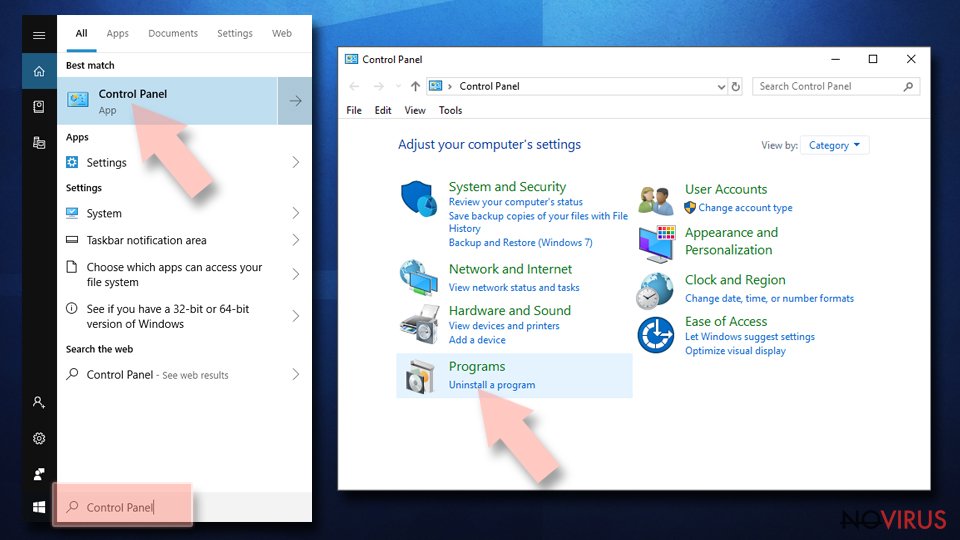
- Type Control Panel into Windows search and once the result shows up hit Enter.
- Under Programs, choose Uninstall a program.
- Find components related to suspicious programs.
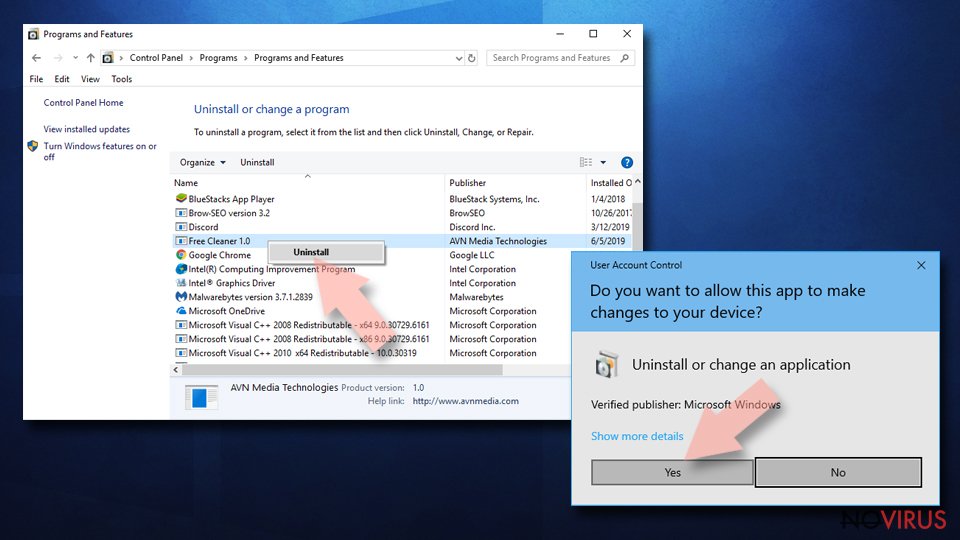
- Right-click on the application and select Uninstall.
- Click Yes when User Account Control shows up.
- Wait for the process of uninstallation to be done and click OK.
Windows 7/XP instructions:
- Click on Windows Start and go to Control Panel on the right pane.
- Choose Add/Remove Programs.
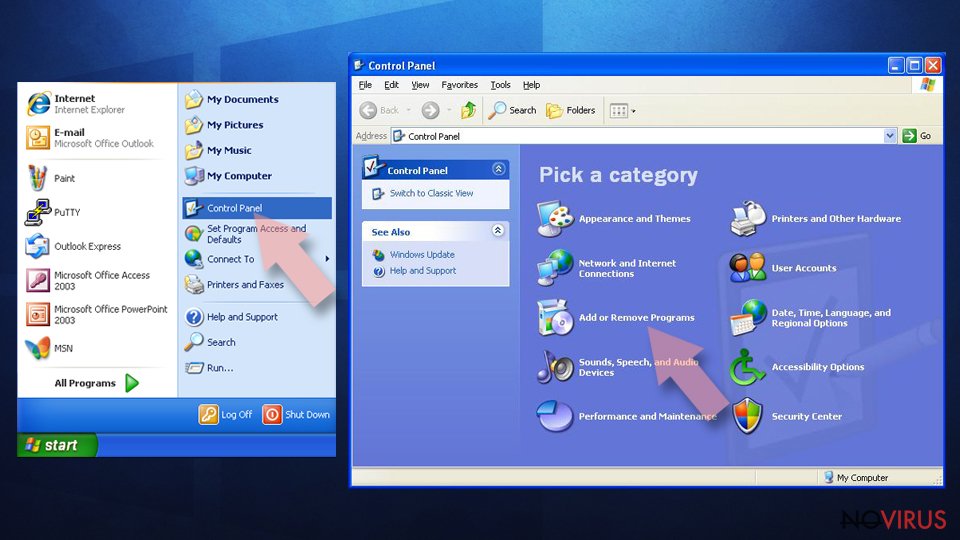
- Select Uninstall a program under Programs in Control Panel.
- Click once on the unwanted application.
- Click Uninstall/Change at the top.
- Confirm with Yes.
- Click OK and finish the removal.
Uninstall DNS Unlocker version 1.3 in Mac OS X system
-
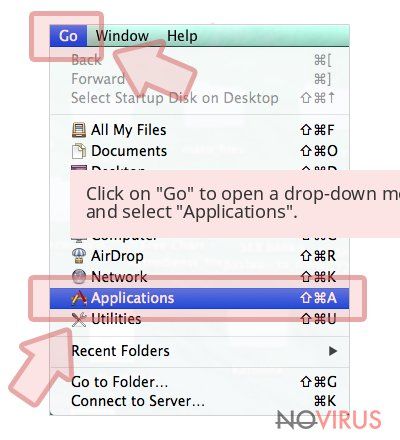
Users who use OS X should click on Go button, which can be found at the top left corner of the screen and select Applications.

-
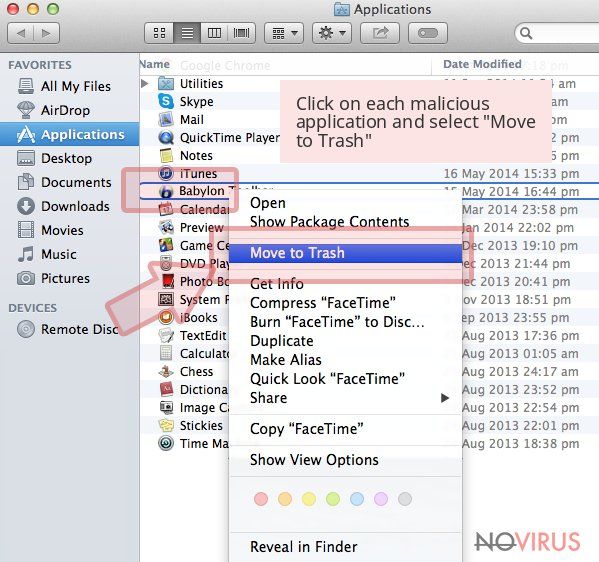
Wait until you see Applications folder and look for DNS Unlocker version 1.3 or any other suspicious programs on it. Now right click on every of such entries and select Move to Trash.

Delete DNS Unlocker version 1.3 from Microsoft Edge
Delete suspicious extensions from MS Edge:
- Go to the Menu by clicking on the three horizontal dots at the top-right.
- Then pick Extensions.
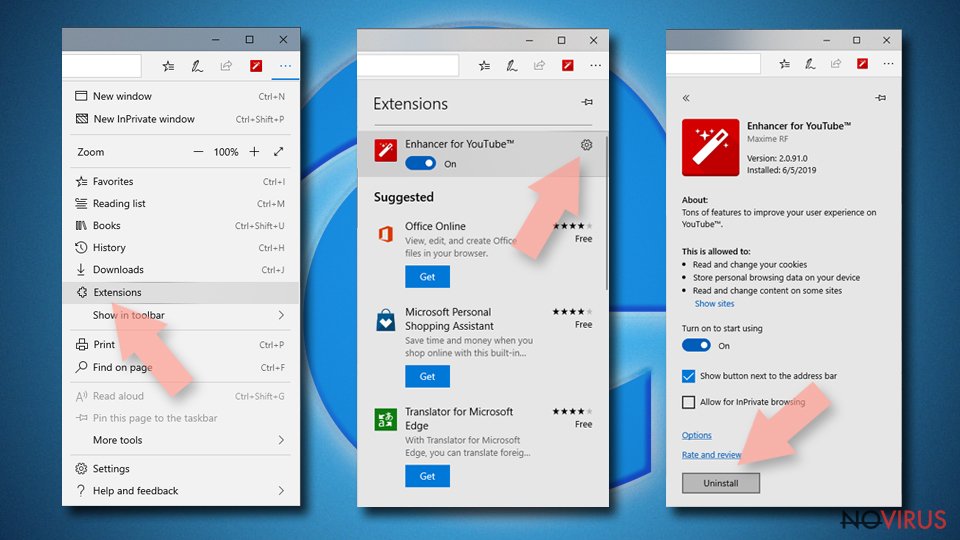
- Choose the unwanted add-ons on the list and click on the Gear icon.
- Click on Uninstall at the bottom.
Clear cookies and other data:
- Click on the Menu and from the context menu select Privacy & security.
- Under Clear browsing data, select Choose what to clear.
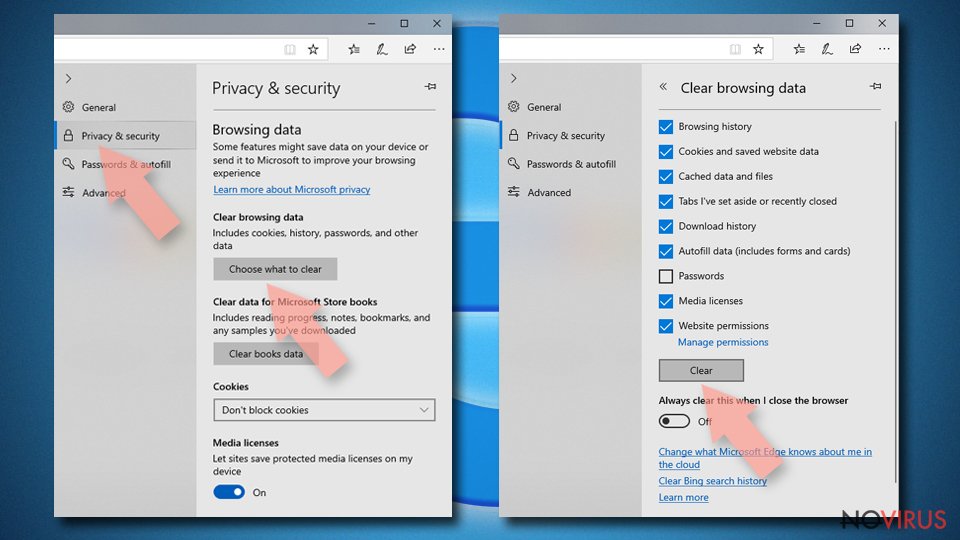
- Choose everything except passwords, and click on Clear.
Alter new tab and homepage settings:
- Click the menu icon and choose Settings.
- Then find On startup section.
- Click Disable if you found any suspicious domain.
Reset MS Edge fully:
- Click on the keyboard Ctrl + Shift + Esc to open Task Manager.
- Choose More details arrow at the bottom.
- Go to Details tab.
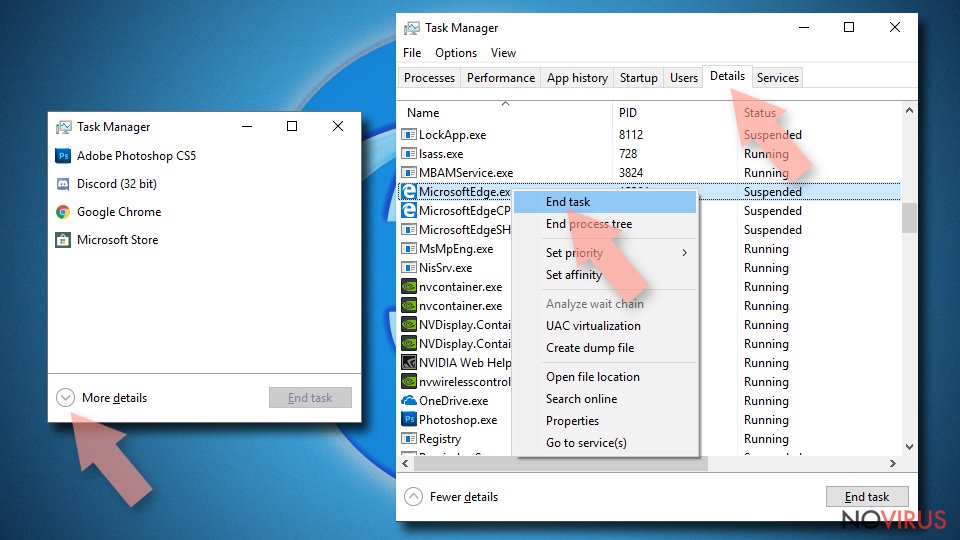
- Now scroll down and locate every entry with Microsoft Edge name in it.
- Right-click on each of them and select End Task to stop MS Edge from running.
When none of the above solves the issue, you might need an advanced Edge reset method, but you need to backup your data before proceeding.
- Find the following folder on the PC: C:\\Users\\%username%\\AppData\\Local\\Packages\\Microsoft.MicrosoftEdge_8wekyb3d8bbwe.
- Press Ctrl + A on your keyboard to select all folders.
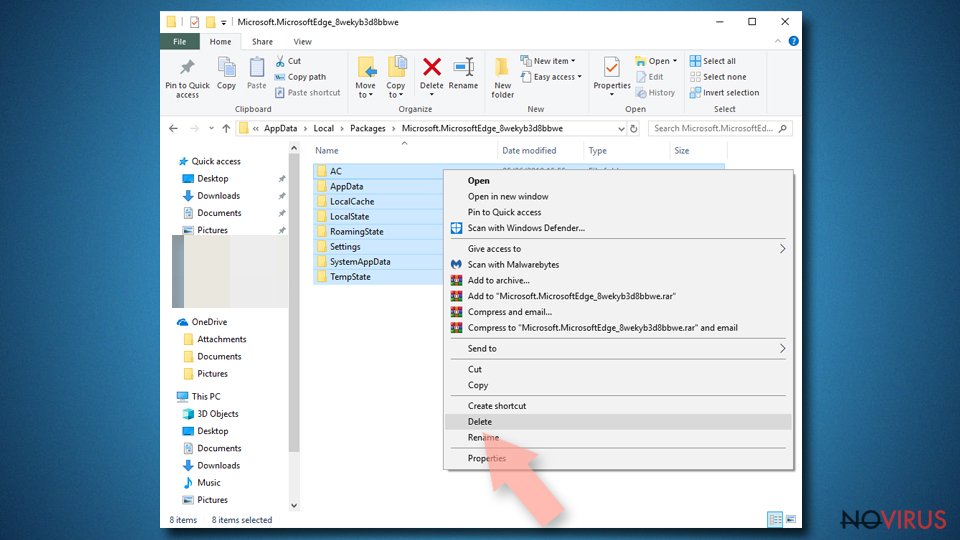
- Right-click on the selection and choose Delete
- Right-click on the Start button and pick Windows PowerShell (Admin).
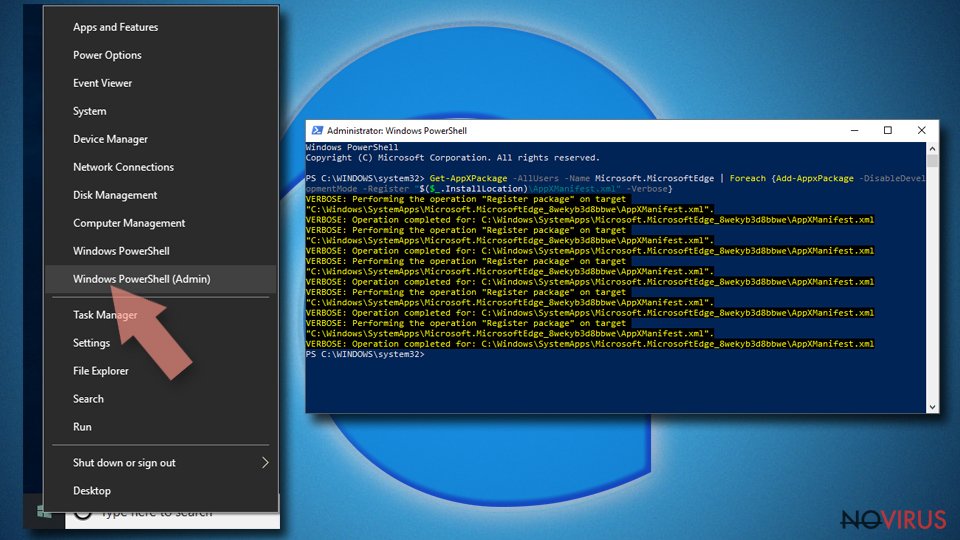
- Copy and paste the following command, and then press Enter:
Get-AppXPackage -AllUsers -Name Microsoft.MicrosoftEdge | Foreach {Add-AppxPackage -DisableDevelopmentMode -Register “$($_.InstallLocation)\\AppXManifest.xml” -Verbose
Instructions for Chromium-based Edge
Delete extensions:
- Open Edge and click Settings.
- Then find Extensions.
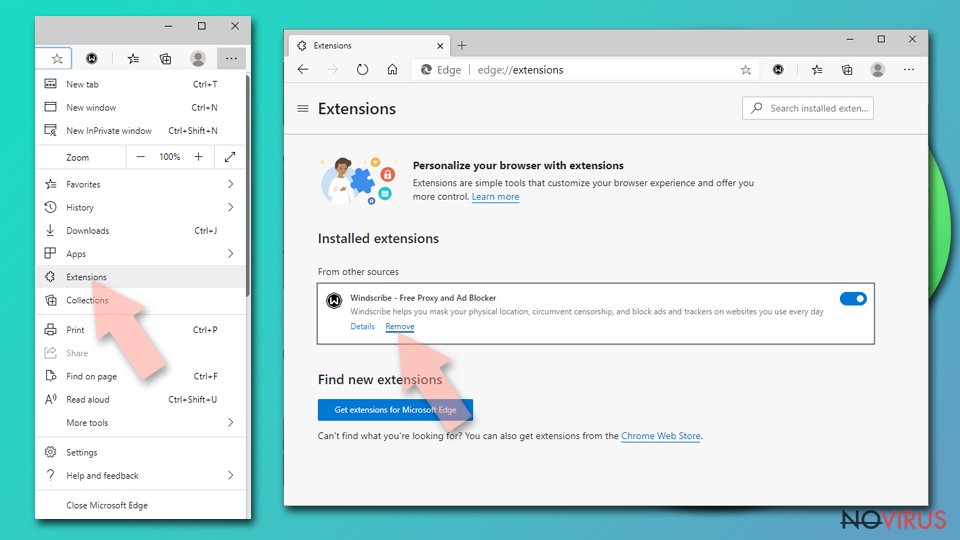
- Delete unwanted extensions with the Remove.
Clear cache and site data:
- Click on Menu and then Settings.
- Find Privacy and services.
- Locate Clear browsing data, then click Choose what to clear.
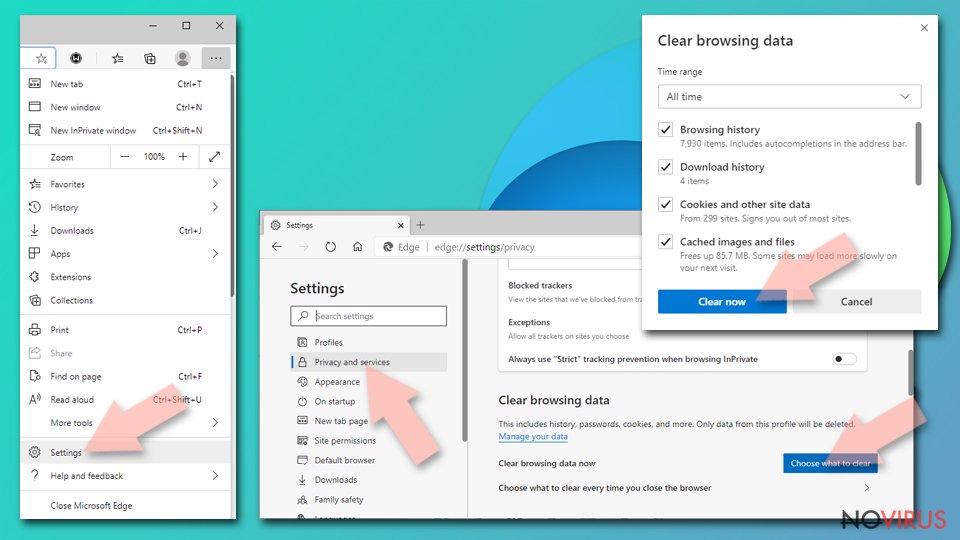
- Time range.
- Click All time.
- Select Clear now.
Reset Chromium-based MS Edge browser fully:
- Go to Settings.
- On the left side, choose Reset settings.
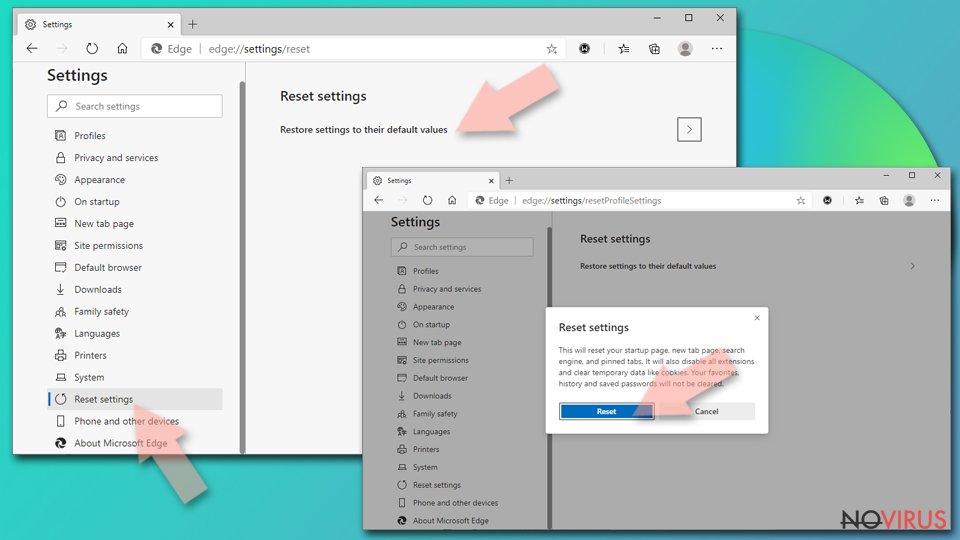
- Select Restore settings to their default values.
- Click Reset.
Delete DNS Unlocker version 1.3 from Mozilla Firefox (FF)
Remove suspicious Firefox extensions:
- Open Mozilla Firefox browser and click on the three horizontal lines at the top-right to open the menu.
- Select Add-ons in the context menu.
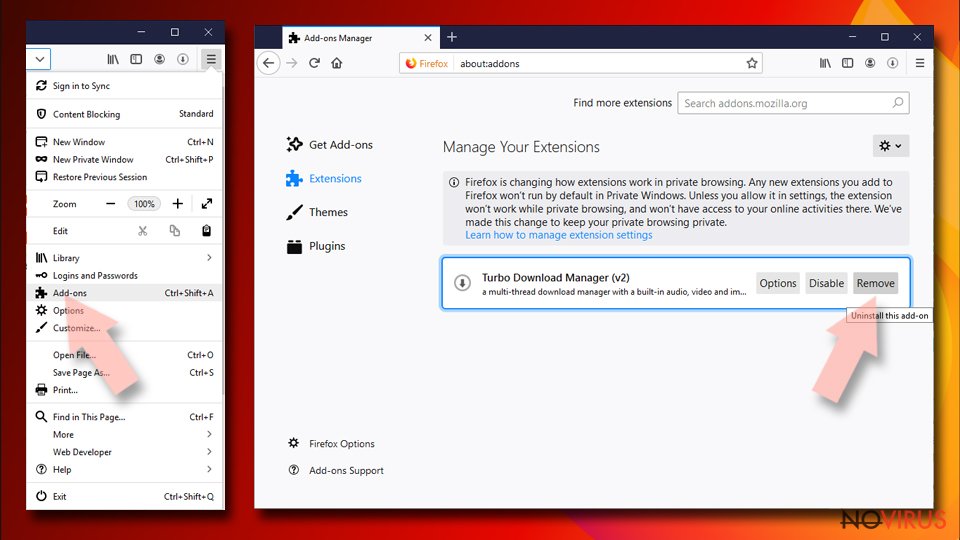
- Choose plugins that are creating issues and select Remove.
Reset the homepage on the browser:
- Click three horizontal lines at the top right corner.
- This time select Options.
- Under Home section, enter your preferred site for the homepage that will open every time you launch Mozilla Firefox.
Clear cookies and site data:
- Click Menu and pick Options.
- Find the Privacy & Security section.
- Scroll down to choose Cookies and Site Data.
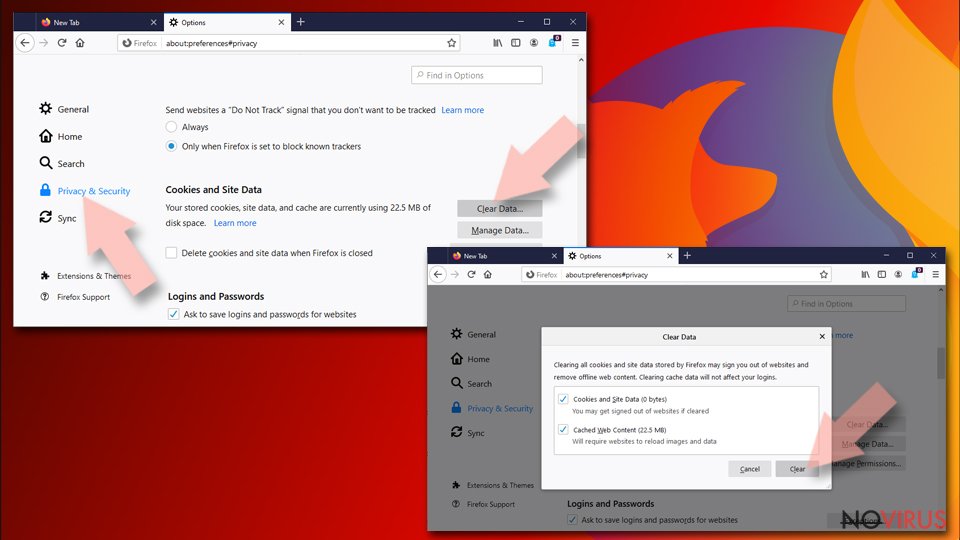
- Click on Clear Data… option.
- Click Cookies and Site Data, Cached Web Content and press Clear.
Reset Mozilla Firefox:
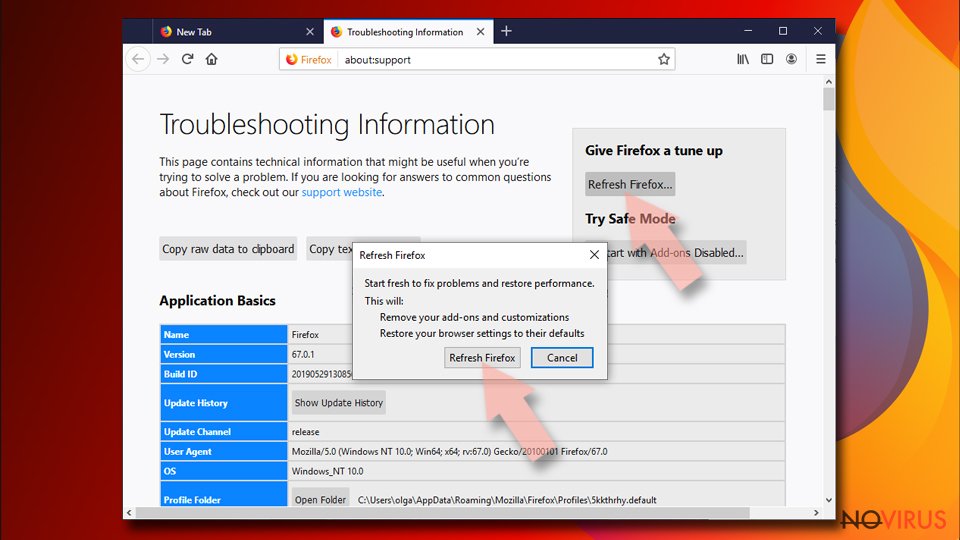
If none of the steps above helped you, reset Mozilla Firefox as follows:
- Open Mozilla Firefox and go to the menu.
- Click Help and then choose Troubleshooting Information.
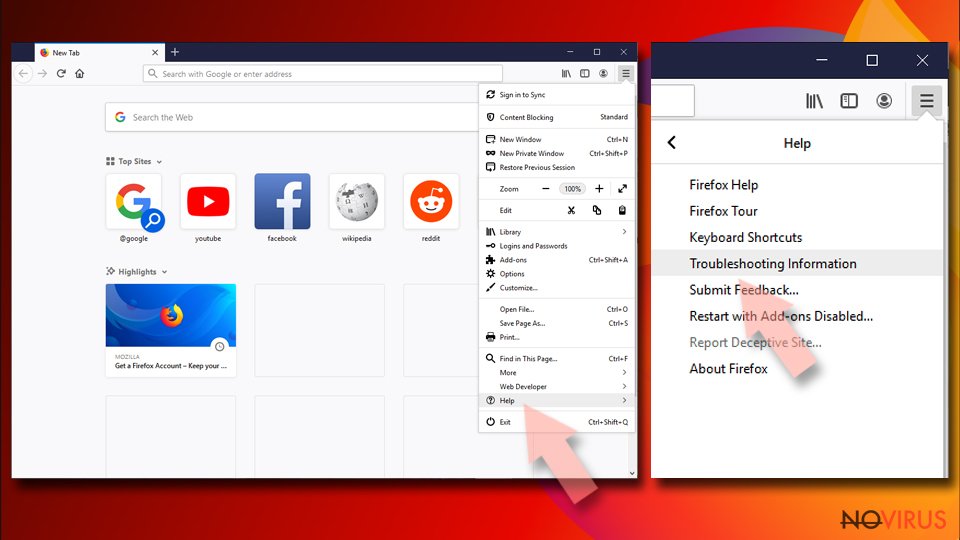
- Locate Give Firefox a tune-up section, click on Refresh Firefox…
- Confirm the action by pressing on Refresh Firefox on the pop-up.
Chrome browser reset
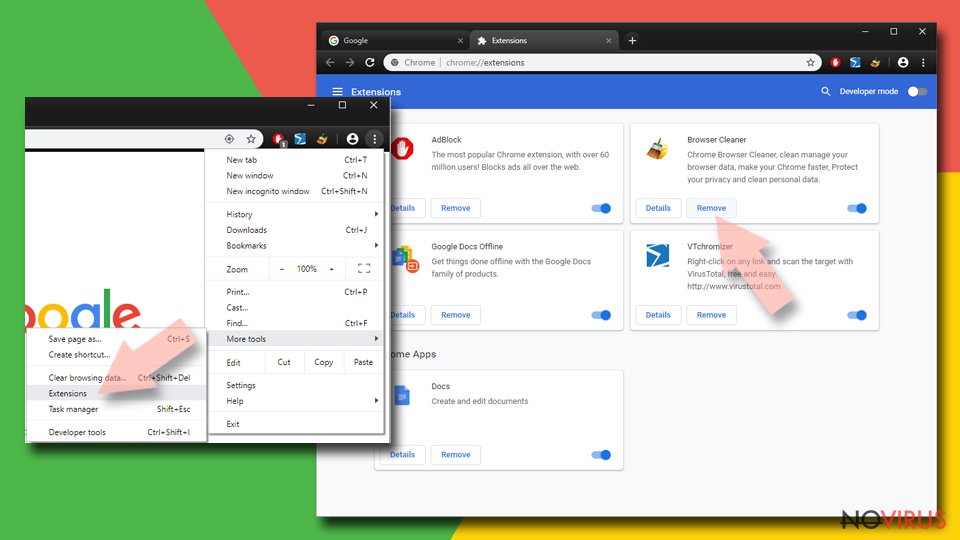
Find and remove suspicious extensions from Google Chrome:
- In Google Chrome, open the Menu by clicking three vertical dots at the top-right corner.
- Select More tools > Extensions.
- Once the window opens, you will see all the installed extensions.
- Find any suspicious add-ons related to any PUP.
- Uninstall them by clicking Remove.
Clear cache and web data from Chrome:
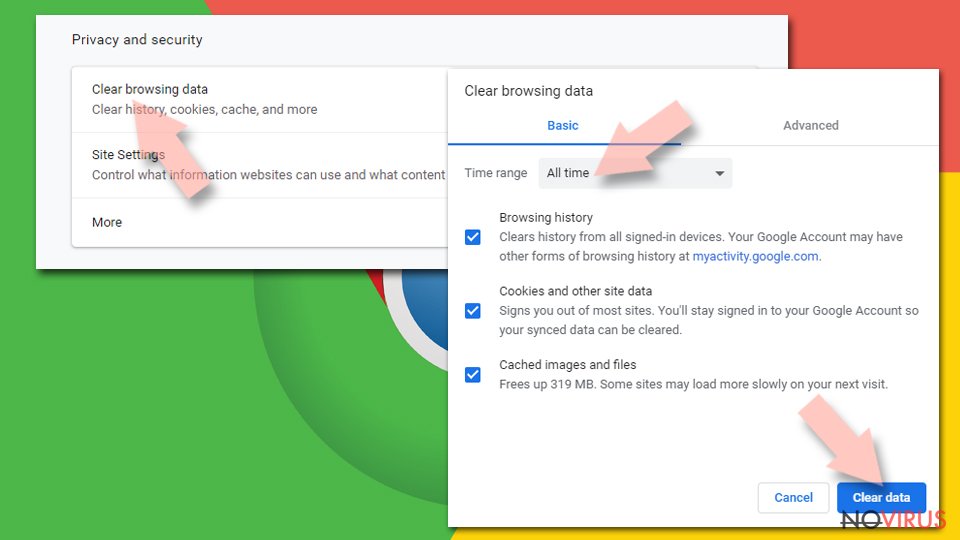
- Click the Menu and select Settings.
- Find Privacy and security section.
- Choose Clear browsing data.
- Select Browsing history.
- Cookies and other site data, also Cached images and files.
- Click Clear data.
Alter settings of the homepage:
- Go to the menu and choose Settings.
- Find odd entries in the On startup section.
- Click on Open a specific or set of pages.
- Then click on three dots and look for the Remove option.
Reset Google Chrome fully:
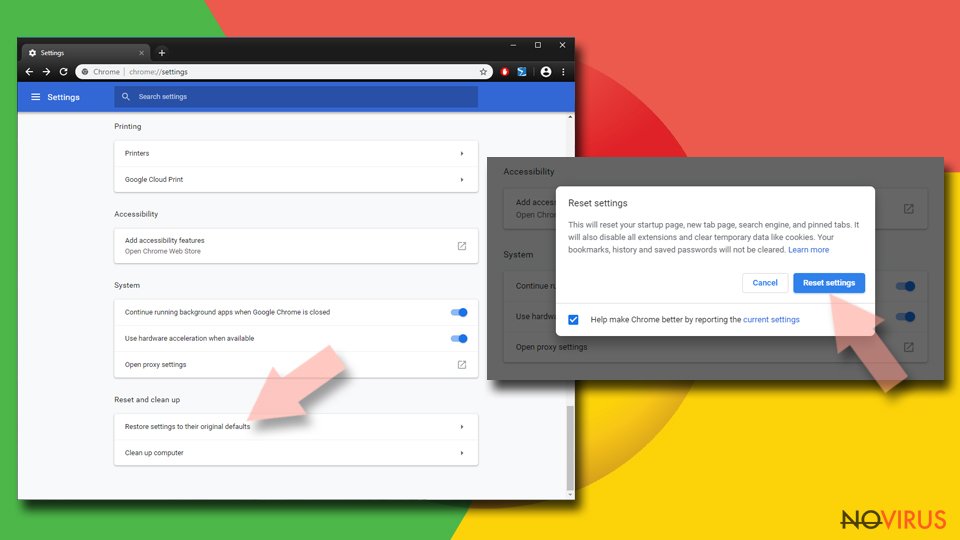
You might need to reset Google Chrome and properly eliminate all the unwanted components:
- Go to Chrome Settings.
- Once there, scroll down to expand Advanced section.
- Scroll down to choose Reset and clean up.
- Click Restore settings to their original defaults.
- Click Reset settings again.
Delete DNS Unlocker version 1.3 from Safari
Get rid of questionable extensions from Safari:
- Click Safari.
- Then go to Preferences…
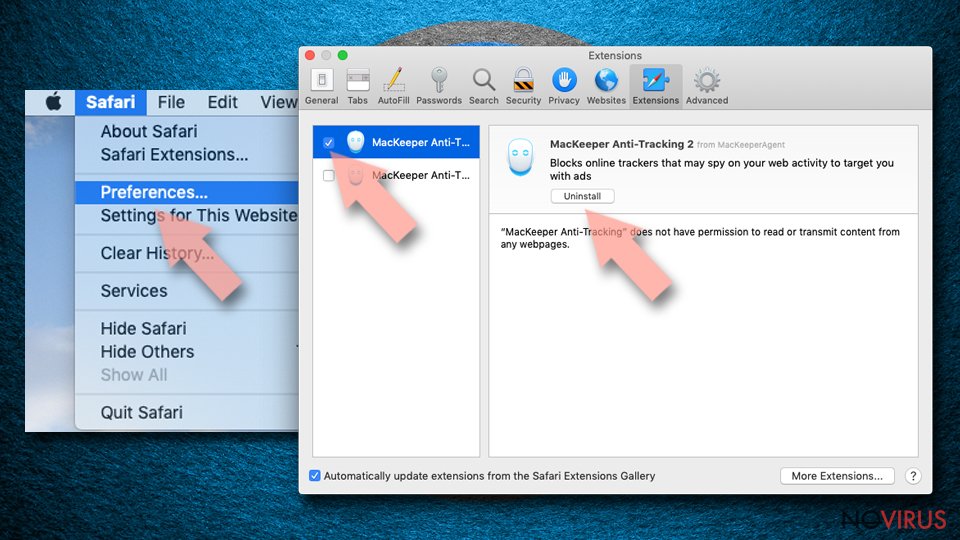
- Choose Extensions on the menu.
- Select the unwanted extension and then pick Uninstall.
Clear cookies from Safari:
- Click Safari.
- Choose Clear History…
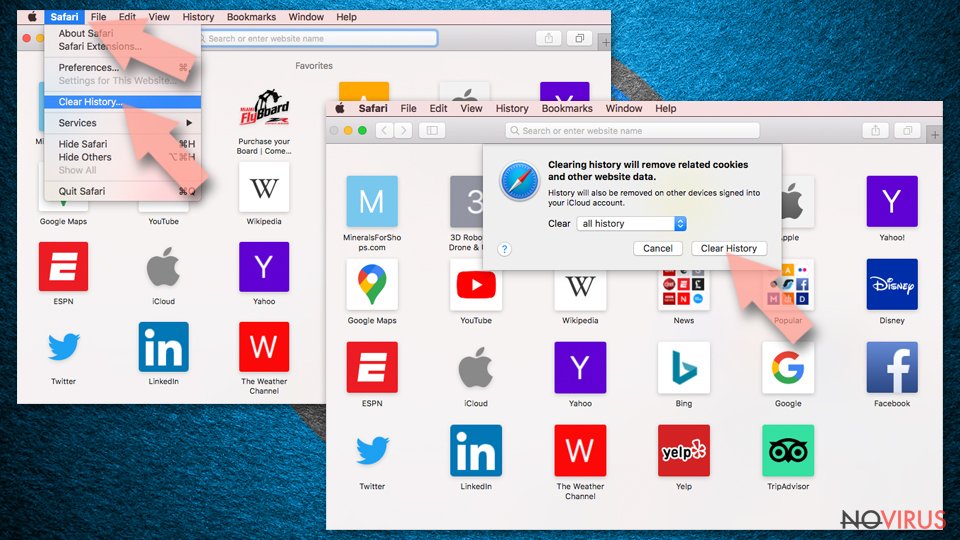
- From the drop-down menu under Clear, find and pick all history.
- Confirm with Clear History.
Reset Safari fully:
- Click Safari and then Preferences…
- Choose the Advanced tab.
- Tick the Show Develop menu in the menu bar.
- From the menu bar, click Develop.
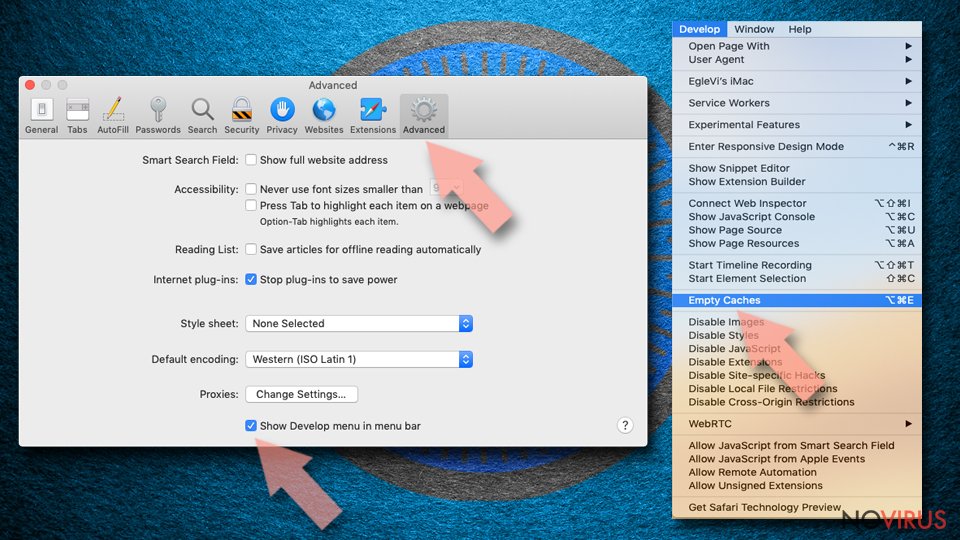
- Then select Empty Caches.
Even if you have completed all the steps above, we still strongly recommend you to scan your computer system with a powerful anti-malware software. It is advisable to do that because an automatic malware removal tool can detect and delete all remains of DNS Unlocker version 1.3, for instance, its registry keys. The anti-malware program can help you to easily detect and eliminate possibly dangerous software and malicious viruses in an easy way. You can use any of our top-rated malware removal programs: FortectIntego, SpyHunter 5Combo Cleaner or Malwarebytes.
How to prevent from getting adware
Securely connect to your website wherever you are
Sometimes you may need to log in to a content management system or server more often, especially if you are actively working on a blog, website, or different project that needs constant maintenance or that requires frequent content updates or other changes. Avoiding this problem can be easy if you choose a dedicated/fixed IP address. It's a static IP address that only belongs to a specific device and does not change when you are in different locations.
VPN service providers such as Private Internet Access can help you with these settings. This tool can help you control your online reputation and successfully manage your projects wherever you are. It is important to prevent different IP addresses from connecting to your website. With a dedicated/fixed IP address, VPN service, and secure access to a content management system, your project will remain secure.
Recover files damaged by a dangerous malware attack
Despite the fact that there are various circumstances that can cause data to be lost on a system, including accidental deletion, the most common reason people lose photos, documents, videos, and other important data is the infection of malware.
Some malicious programs can delete files and prevent the software from running smoothly. However, there is a greater threat from the dangerous viruses that can encrypt documents, system files, and images. Ransomware-type viruses focus on encrypting data and restricting users’ access to files, so you can permanently lose personal data when you download such a virus to your computer.
The ability to unlock encrypted files is very limited, but some programs have a data recovery feature. In some cases, the Data Recovery Pro program can help recover at least some of the data that has been locked by a virus or other cyber infection.
