Remove SearchAssist.net (Detailed Removal Instructions) - Chrome, Firefox, IE, Edge
SearchAssist.net Removal Guide
Description of SearchAssist.net
SearchAssist sparks concerns about its reliability
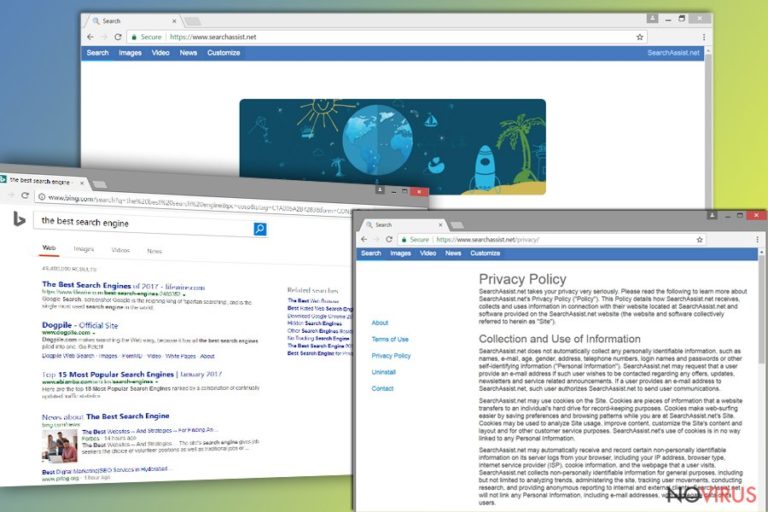
SearchAssist.net functions as a browsing engine. It is promoted in questionable ways. As a result, some users may not even recall having installed this tool on their browsers. Besides, once you visit its homepage, you might also notice a pop-up offering to install its SearchAssist.me plug-in.
Both, the extension and the search engine, are fully compatible with Internet Explorer, Google Chrome and Mozilla Firefox, Safari, and Mozilla Firefox. Though there are even two identical versions of Search Assist and one called “SearchAssist Tools” browser extensions available on Chrome web store, they do not raise the overall reputation of Search Assist products.
First of all, the PUP is distributed as an optional program pinned to other free applications. Most likely, you might spot it during the installation wizard of a file converter or audio editor. Unfortunately, PUP-like programs are promoted in such way.
Secondly, though this browsing tool does not collect personal information nor it shares non-personal information with third parties, it cooperates with Trovi Search browsing tool. Search Assist provides some search results delivered by the former tool. The latter takes users’ privacy differently, In its privacy policy, some users might get astonished by the following line:
We may also share PII and non-personally identifiable information with our subsidiaries, affiliated, and parent companies but their use of such information must comply with this Privacy Policy.
As a result, not only does your privacy gets endangered, but within a while, more personalized commercial offers might start interrupting your browsing sessions.
Due to these reasons, Search Assist has been classified as a browser hijacker. Therefore, certain functionalities of this PUP should not be ignored. For instance, SearchAssist.net redirect might mislead you to potentially insecure domains due to the very mentioned Trovi.com site.
Therefore, there are more than enough reasons to remove SearchAssist.net from the browser. You can do so faster with FortectIntego or Malwarebytes. The tool will assist you in getting rid of all cookies and elements associated with the browsing tool.
More picky users may also spot that there are no full company credentials. Though there is a 'Contact Us' form, nonetheless, no official address of the company. It is another aspect which only accounts to the obscure reputation of this tool. Therefore, SearchAssist removal might be a wiser decision. You can do so manually or with the assistance with malware elimination tool. You may also combine these two methods to ensure that no SearchAssist.net elements remain.
Other variations of the hijacker
MyPrivacyAssistant.com virus is an identical version of SearchAssist.net. MyPrivacyAssistant displays the same home page. It is also promoted via SearchAssist Tools browser plug-in.
It does not seem to contain any exceptional features. Like its counterpart, it cooperates with Trovi search tool. If you get redirected there once in a while, it is time for you to eliminate its web scripts.
PUP distribution methods remain the same
The developers of this browsing tool have “expanded” the promotion network quite much. Either you install one of the two identical SearchAssist.me browser plug-ins or SearchAssist Tools plug-in, your default search engine will be replaced to MyPrivacyAssistant.com or SearchAssist.com.
Due to its relation to Trovi hijackers, you may spot the hijacker promoted in their domains. In addition, you should be careful while installing new programs. Instead of 'Express', opt for 'Advanced' installation mode. It will reveal optional programs, and you will be able to deselect unnecessary options. 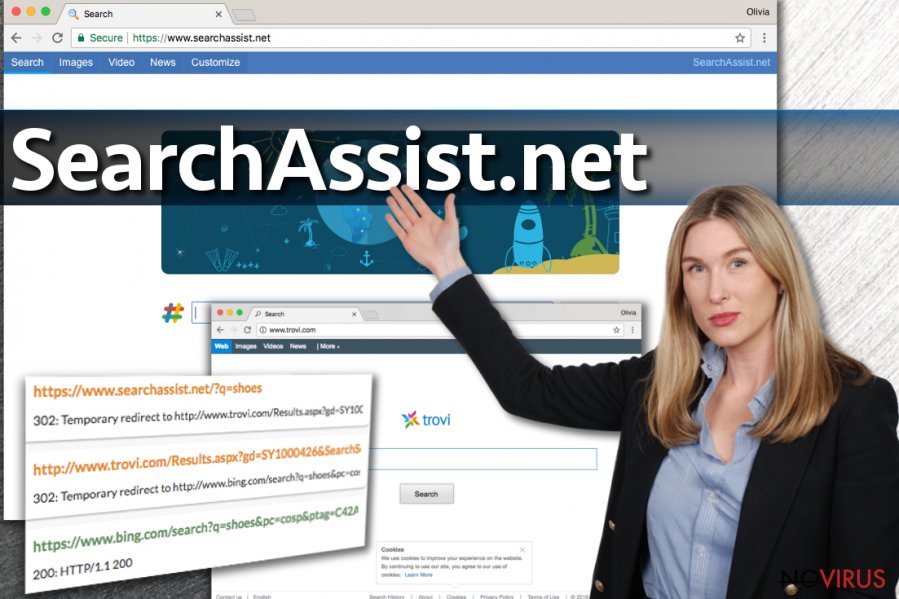
Eliminate SearchAssist.net from the browser
If your default search engine was replaced as a result of adding one of the mentioned browser extensions, you will need to eradicate both of them. Delete the extensions manually. Afterward, you can scan with an anti-malware tool and remove SearchAssist.net virus elements faster.
You may rely on the automatic elimination entirely. Note that it would be better to carry out SearchAssist removal in all browsers if you have several of them.
You may remove virus damage with a help of FortectIntego. SpyHunter 5Combo Cleaner and Malwarebytes are recommended to detect potentially unwanted programs and viruses with all their files and registry entries that are related to them.
Getting rid of SearchAssist.net. Follow these steps
Uninstall SearchAssist.net in Windows systems
Whether you opt for an automatic or manual SearchAssist.net removal, it is recommended to check for its registry entries in Registry Editor. launch it by pressing Windows key+R, type regedit and then press Enter. After that, go to Edit section and choose Find next option. Type in the title of the PUP and search for its related registry entries. If you find any, delete them.
Terminate suspicious programs from Windows 10/8 machines by following these instructions:
- Type Control Panel into Windows search and once the result shows up hit Enter.
- Under Programs, choose Uninstall a program.
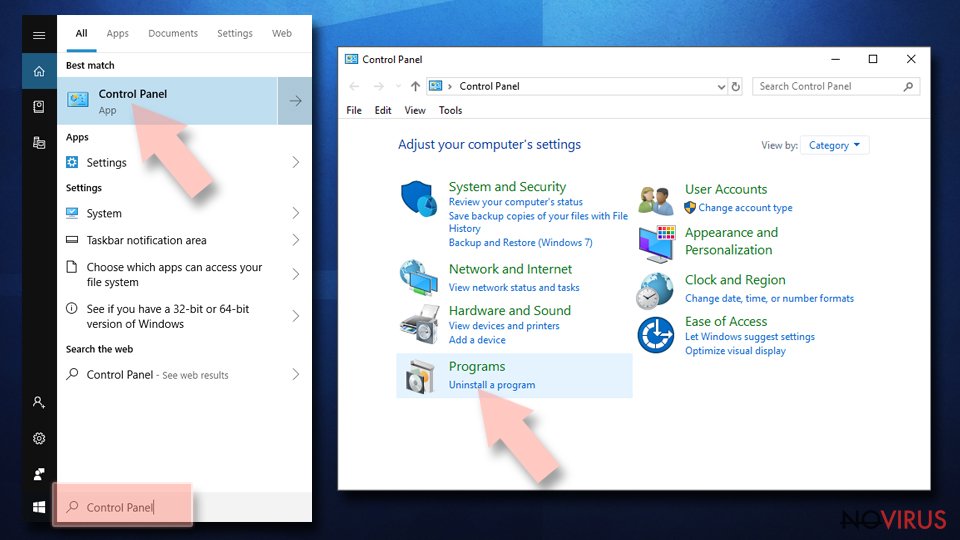
- Find components related to suspicious programs.
- Right-click on the application and select Uninstall.
- Click Yes when User Account Control shows up.
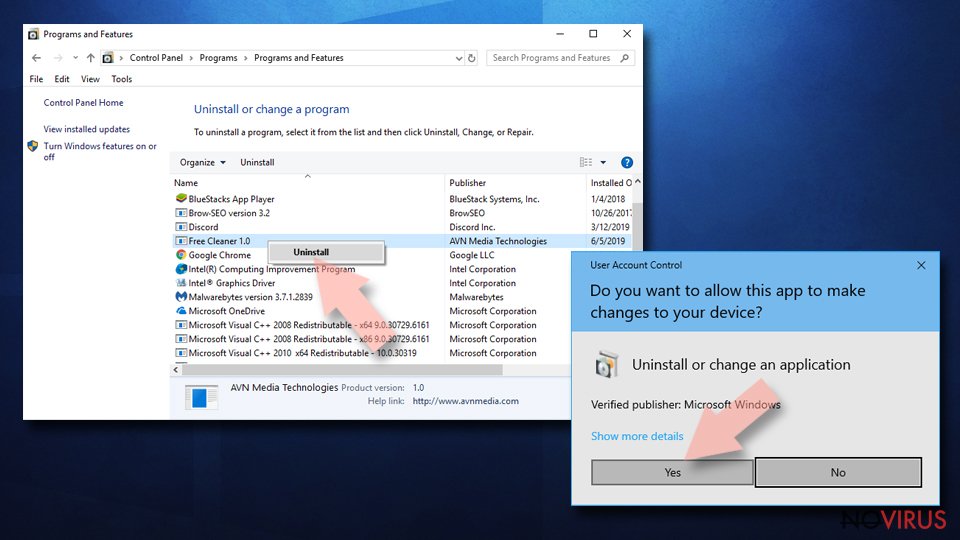
- Wait for the process of uninstallation to be done and click OK.
Windows 7/XP instructions:
- Click on Windows Start and go to Control Panel on the right pane.
- Choose Add/Remove Programs.
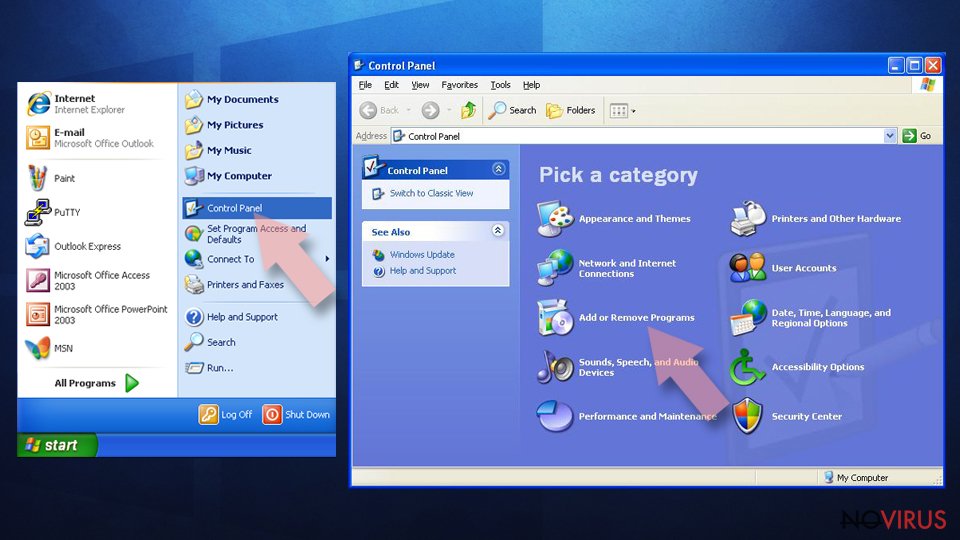
- Select Uninstall a program under Programs in Control Panel.
- Click once on the unwanted application.
- Click Uninstall/Change at the top.
- Confirm with Yes.
- Click OK and finish the removal.
Uninstall SearchAssist.net in Mac OS X system
-
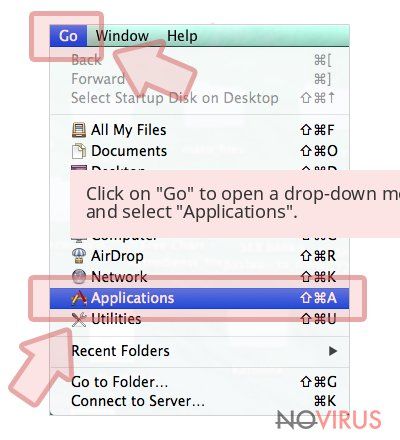
Users who use OS X should click on Go button, which can be found at the top left corner of the screen and select Applications.

-
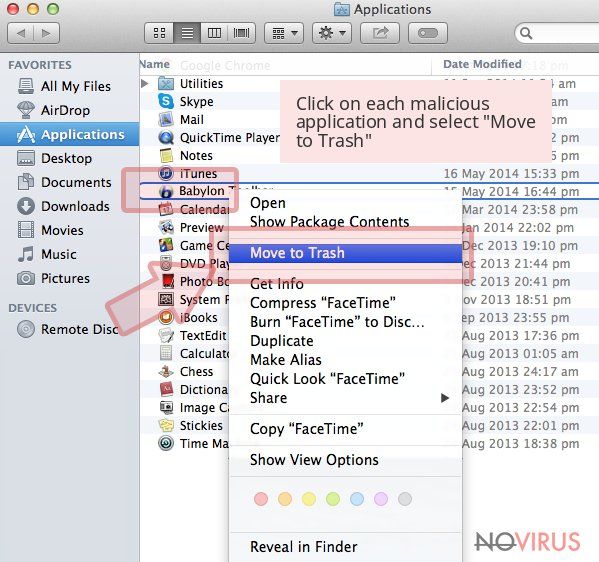
Wait until you see Applications folder and look for SearchAssist.net or any other suspicious programs on it. Now right click on every of such entries and select Move to Trash.

Delete SearchAssist.net from Microsoft Edge
Delete suspicious extensions from MS Edge:
- Go to the Menu by clicking on the three horizontal dots at the top-right.
- Then pick Extensions.
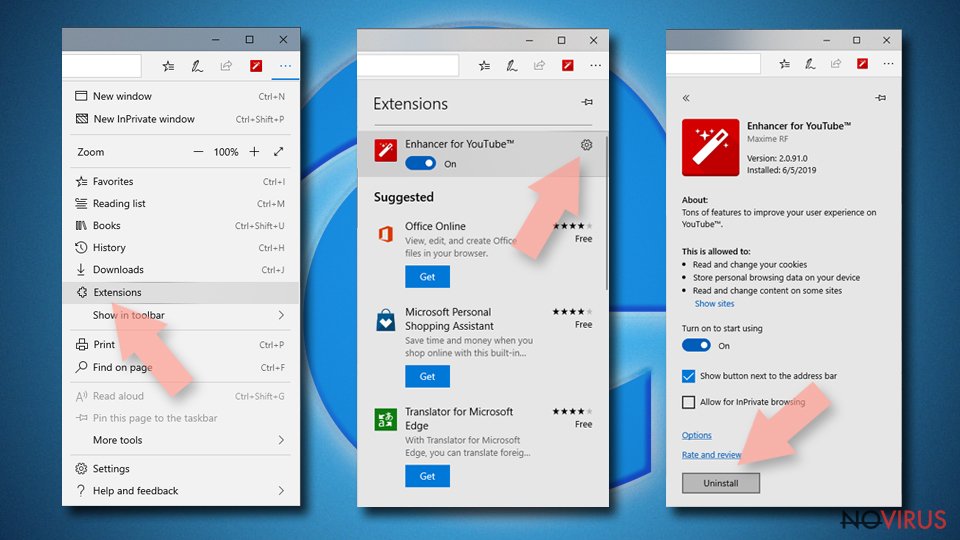
- Choose the unwanted add-ons on the list and click on the Gear icon.
- Click on Uninstall at the bottom.
Clear cookies and other data:
- Click on the Menu and from the context menu select Privacy & security.
- Under Clear browsing data, select Choose what to clear.
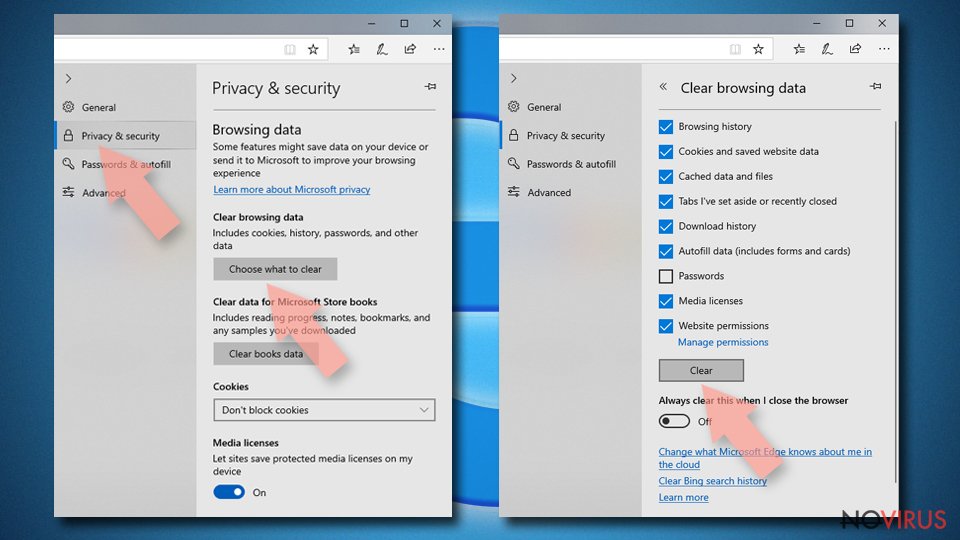
- Choose everything except passwords, and click on Clear.
Alter new tab and homepage settings:
- Click the menu icon and choose Settings.
- Then find On startup section.
- Click Disable if you found any suspicious domain.
Reset MS Edge fully:
- Click on the keyboard Ctrl + Shift + Esc to open Task Manager.
- Choose More details arrow at the bottom.
- Go to Details tab.
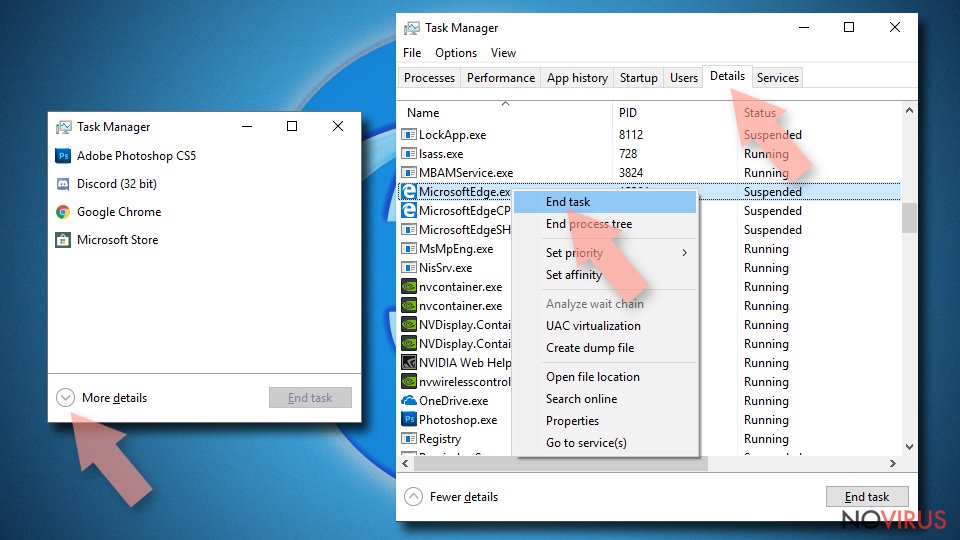
- Now scroll down and locate every entry with Microsoft Edge name in it.
- Right-click on each of them and select End Task to stop MS Edge from running.
When none of the above solves the issue, you might need an advanced Edge reset method, but you need to backup your data before proceeding.
- Find the following folder on the PC: C:\\Users\\%username%\\AppData\\Local\\Packages\\Microsoft.MicrosoftEdge_8wekyb3d8bbwe.
- Press Ctrl + A on your keyboard to select all folders.
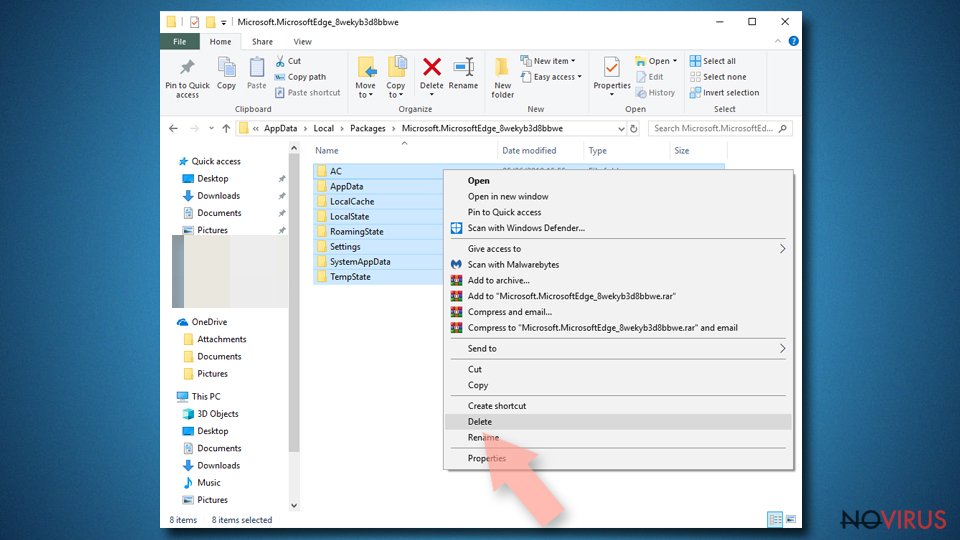
- Right-click on the selection and choose Delete
- Right-click on the Start button and pick Windows PowerShell (Admin).
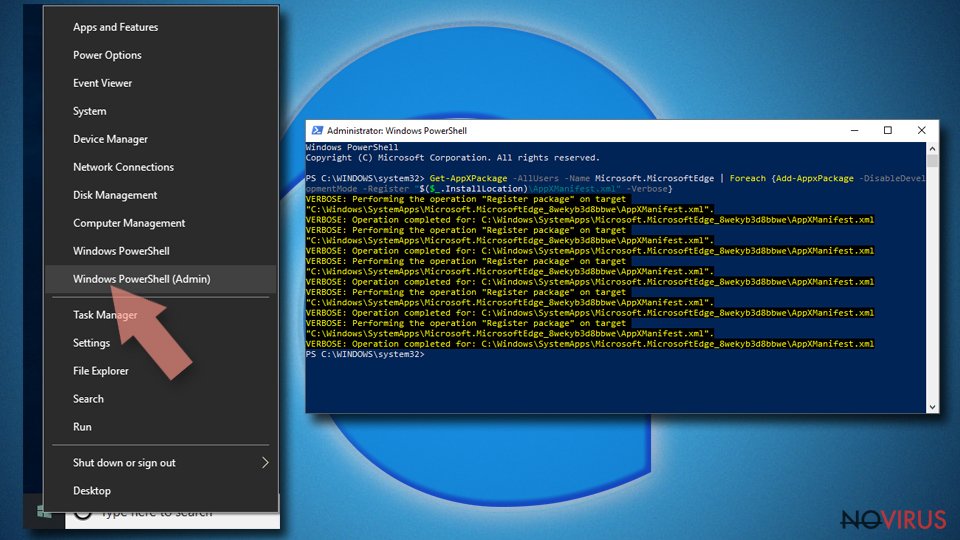
- Copy and paste the following command, and then press Enter:
Get-AppXPackage -AllUsers -Name Microsoft.MicrosoftEdge | Foreach {Add-AppxPackage -DisableDevelopmentMode -Register “$($_.InstallLocation)\\AppXManifest.xml” -Verbose
Instructions for Chromium-based Edge
Delete extensions:
- Open Edge and click Settings.
- Then find Extensions.
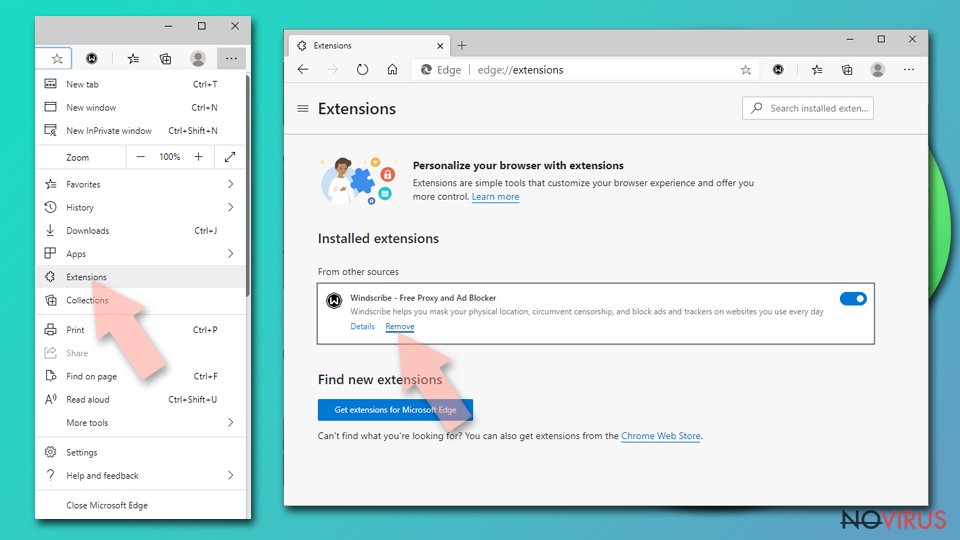
- Delete unwanted extensions with the Remove.
Clear cache and site data:
- Click on Menu and then Settings.
- Find Privacy and services.
- Locate Clear browsing data, then click Choose what to clear.
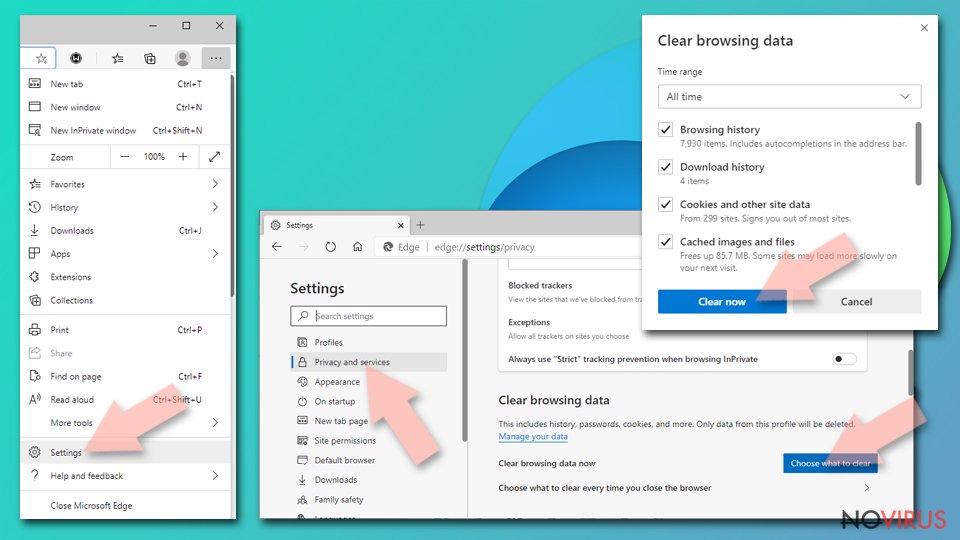
- Time range.
- Click All time.
- Select Clear now.
Reset Chromium-based MS Edge browser fully:
- Go to Settings.
- On the left side, choose Reset settings.
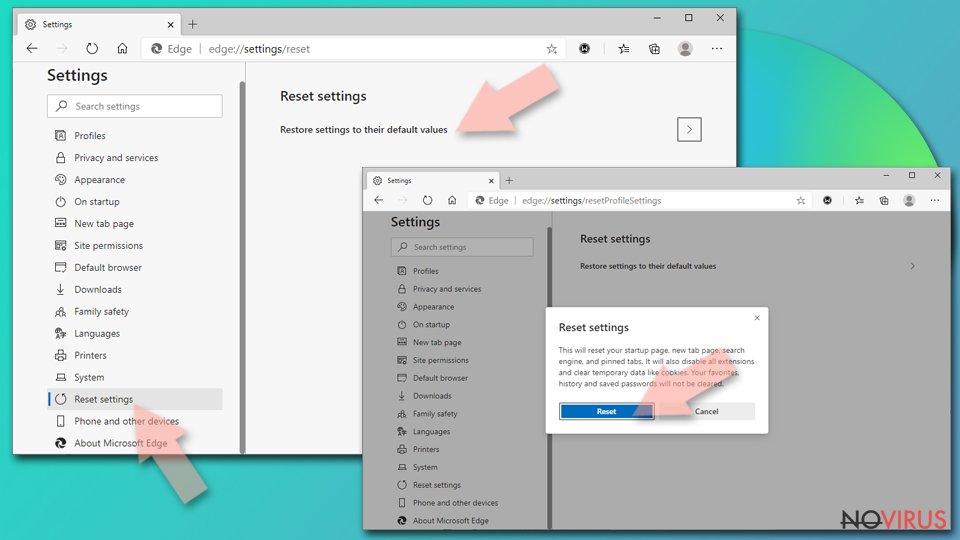
- Select Restore settings to their default values.
- Click Reset.
Delete SearchAssist.net from Mozilla Firefox (FF)
After performing these instructions, restart the browser and make sure no traces of SearchAssist.net remain.
Remove suspicious Firefox extensions:
- Open Mozilla Firefox browser and click on the three horizontal lines at the top-right to open the menu.
- Select Add-ons in the context menu.
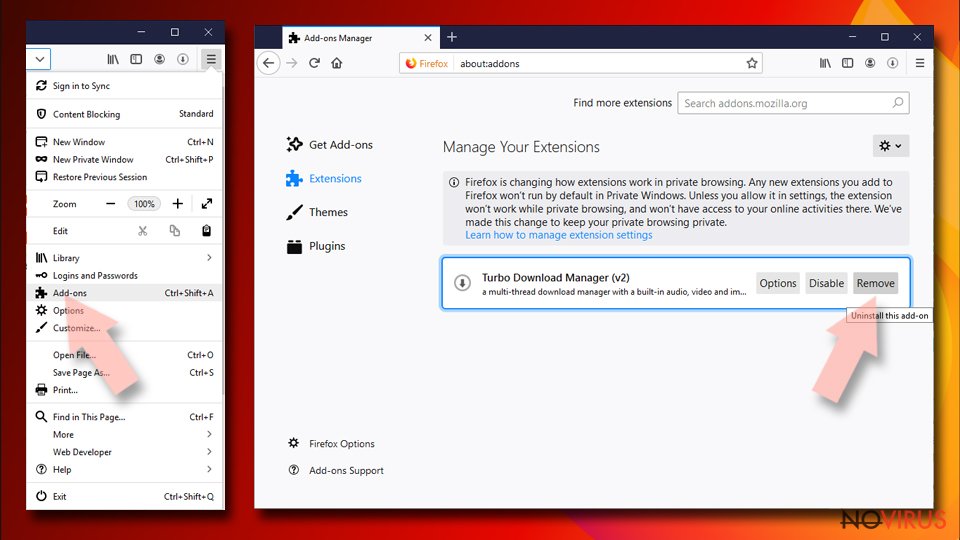
- Choose plugins that are creating issues and select Remove.
Reset the homepage on the browser:
- Click three horizontal lines at the top right corner.
- This time select Options.
- Under Home section, enter your preferred site for the homepage that will open every time you launch Mozilla Firefox.
Clear cookies and site data:
- Click Menu and pick Options.
- Find the Privacy & Security section.
- Scroll down to choose Cookies and Site Data.
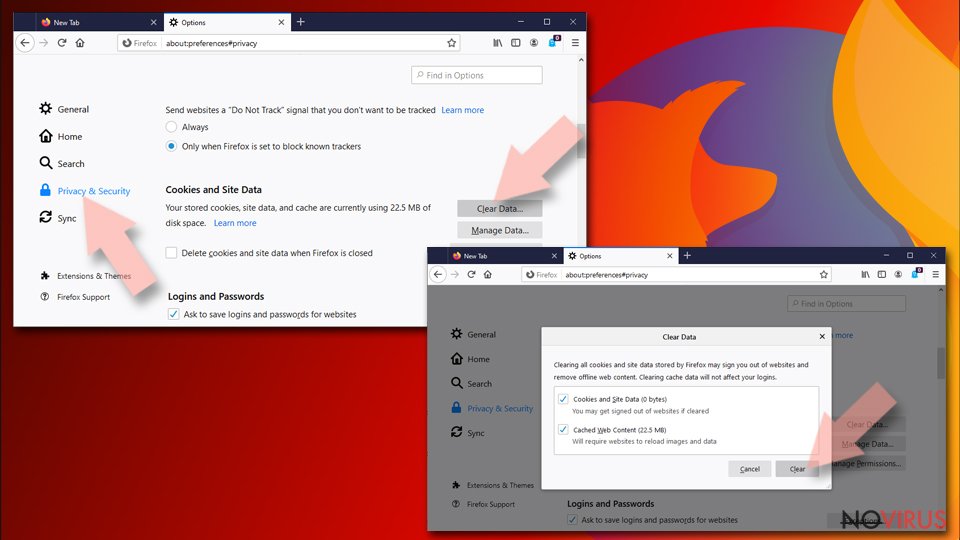
- Click on Clear Data… option.
- Click Cookies and Site Data, Cached Web Content and press Clear.
Reset Mozilla Firefox:
If none of the steps above helped you, reset Mozilla Firefox as follows:
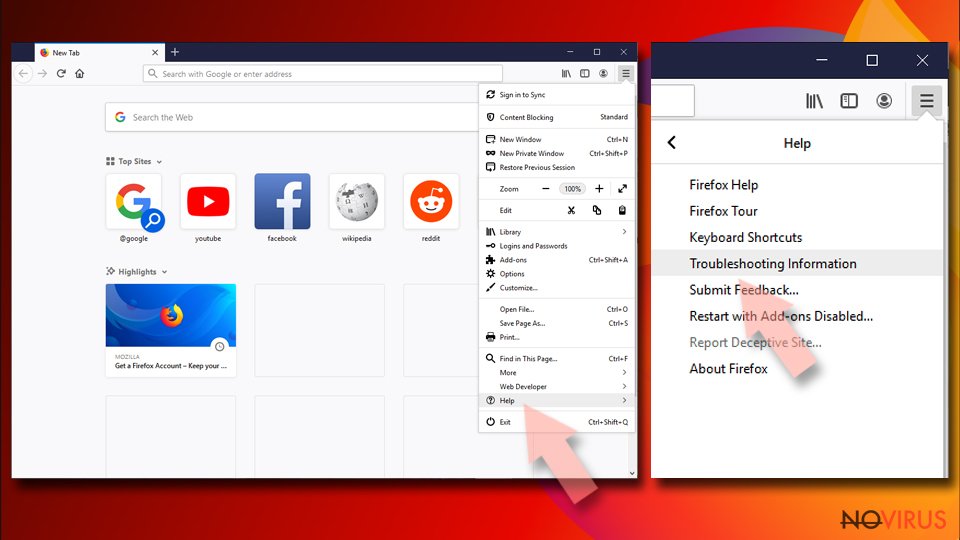
- Open Mozilla Firefox and go to the menu.
- Click Help and then choose Troubleshooting Information.
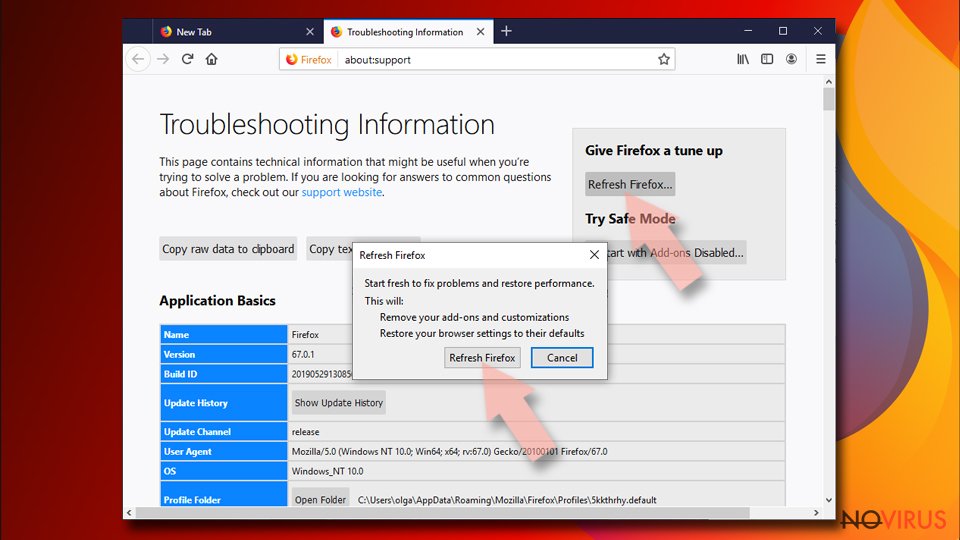
- Locate Give Firefox a tune-up section, click on Refresh Firefox…
- Confirm the action by pressing on Refresh Firefox on the pop-up.
Chrome browser reset
Find and remove suspicious extensions from Google Chrome:
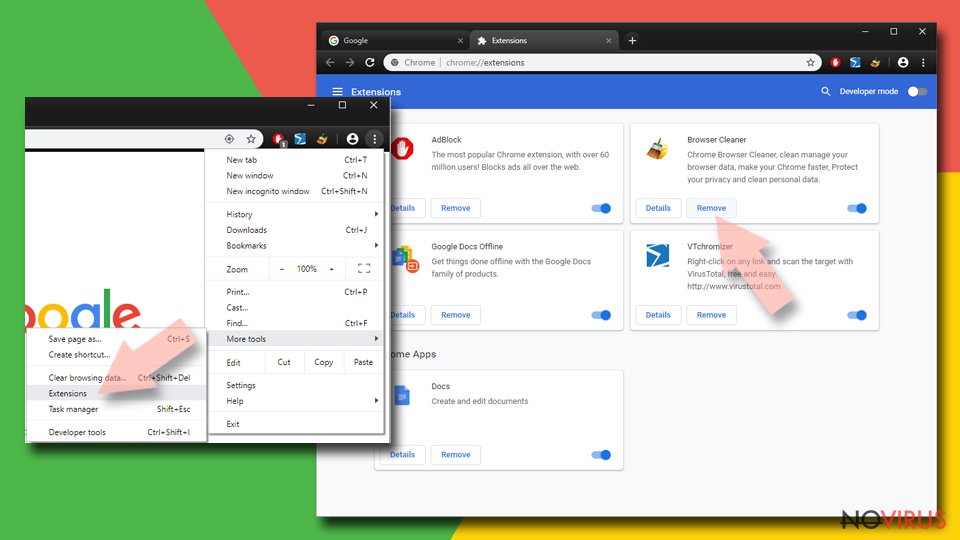
- In Google Chrome, open the Menu by clicking three vertical dots at the top-right corner.
- Select More tools > Extensions.
- Once the window opens, you will see all the installed extensions.
- Find any suspicious add-ons related to any PUP.
- Uninstall them by clicking Remove.
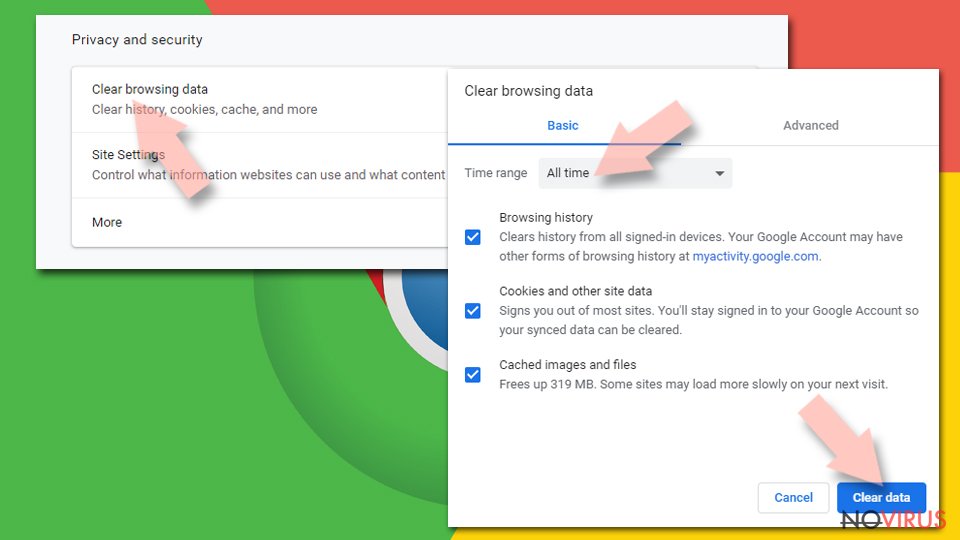
Clear cache and web data from Chrome:
- Click the Menu and select Settings.
- Find Privacy and security section.
- Choose Clear browsing data.
- Select Browsing history.
- Cookies and other site data, also Cached images and files.
- Click Clear data.
Alter settings of the homepage:
- Go to the menu and choose Settings.
- Find odd entries in the On startup section.
- Click on Open a specific or set of pages.
- Then click on three dots and look for the Remove option.
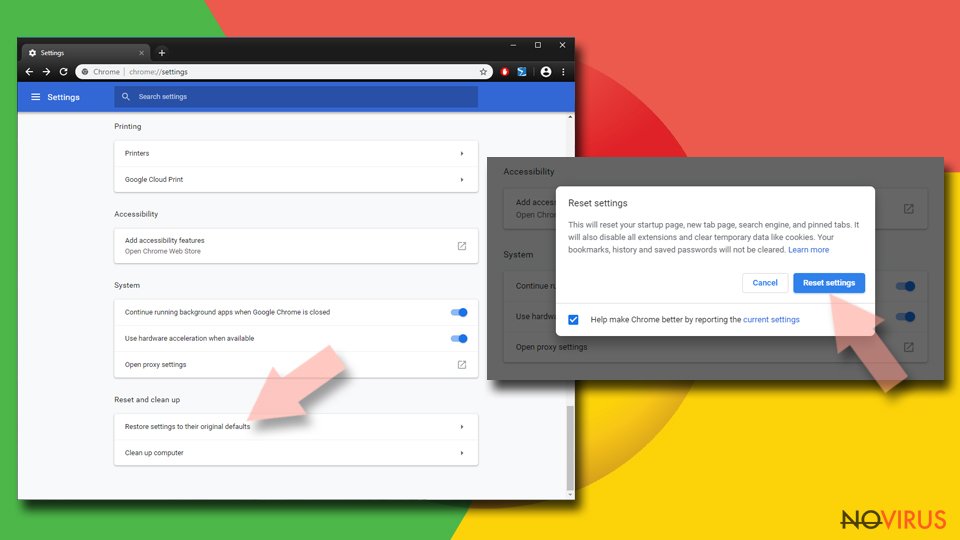
Reset Google Chrome fully:
You might need to reset Google Chrome and properly eliminate all the unwanted components:
- Go to Chrome Settings.
- Once there, scroll down to expand Advanced section.
- Scroll down to choose Reset and clean up.
- Click Restore settings to their original defaults.
- Click Reset settings again.
Delete SearchAssist.net from Safari
Get rid of questionable extensions from Safari:
- Click Safari.
- Then go to Preferences…
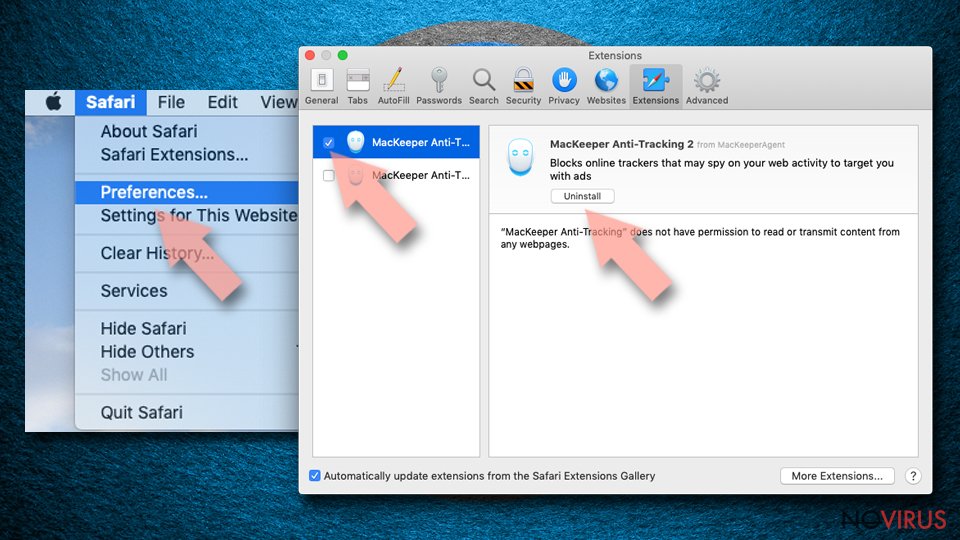
- Choose Extensions on the menu.
- Select the unwanted extension and then pick Uninstall.
Clear cookies from Safari:
- Click Safari.
- Choose Clear History…
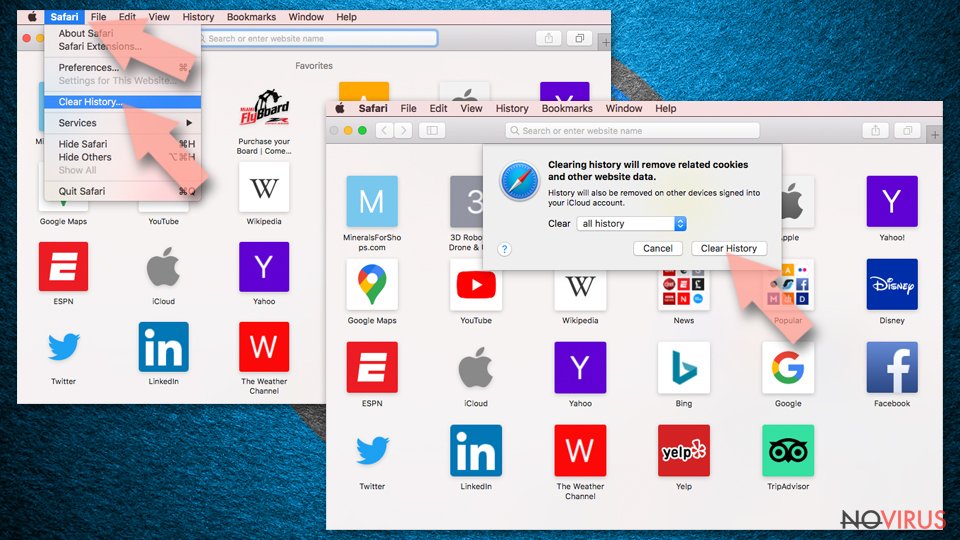
- From the drop-down menu under Clear, find and pick all history.
- Confirm with Clear History.
Reset Safari fully:
- Click Safari and then Preferences…
- Choose the Advanced tab.
- Tick the Show Develop menu in the menu bar.
- From the menu bar, click Develop.
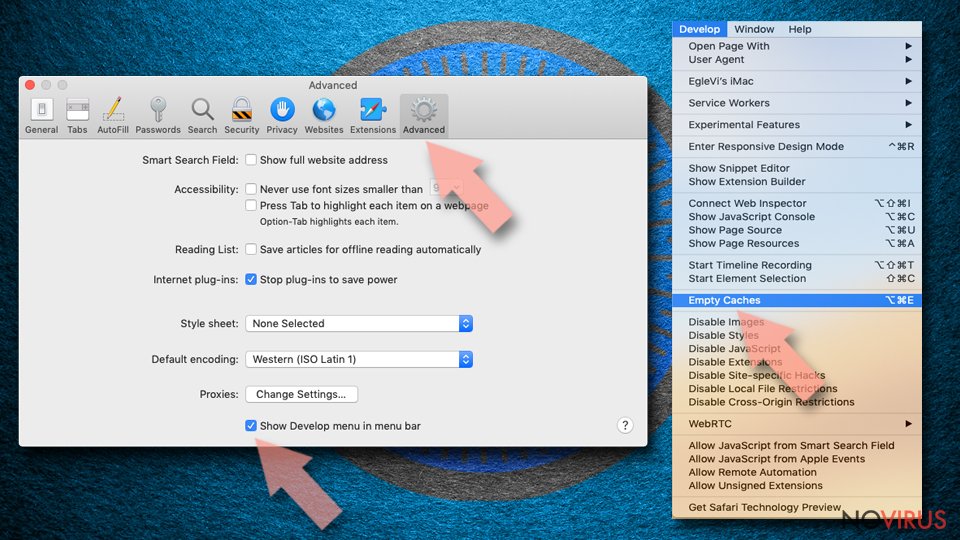
- Then select Empty Caches.
Even if you have completed all the steps above, we still strongly recommend you to scan your computer system with a powerful anti-malware software. It is advisable to do that because an automatic malware removal tool can detect and delete all remains of SearchAssist.net, for instance, its registry keys. The anti-malware program can help you to easily detect and eliminate possibly dangerous software and malicious viruses in an easy way. You can use any of our top-rated malware removal programs: FortectIntego, SpyHunter 5Combo Cleaner or Malwarebytes.
How to prevent from getting browser hijacker
Securely connect to your website wherever you are
Sometimes you may need to log in to a content management system or server more often, especially if you are actively working on a blog, website, or different project that needs constant maintenance or that requires frequent content updates or other changes. Avoiding this problem can be easy if you choose a dedicated/fixed IP address. It's a static IP address that only belongs to a specific device and does not change when you are in different locations.
VPN service providers such as Private Internet Access can help you with these settings. This tool can help you control your online reputation and successfully manage your projects wherever you are. It is important to prevent different IP addresses from connecting to your website. With a dedicated/fixed IP address, VPN service, and secure access to a content management system, your project will remain secure.
Reduce the threat of viruses by backing up your data
Due to their own careless behavior, computer users can suffer various losses caused by cyber infections. Viruses can affect the functionality of the software or directly corrupt data on your system by encrypting it. These problems can disrupt the system and cause you to lose personal data permanently. There is no such threat if you have the latest backups, as you can easily recover lost data and get back to work.
It is recommended to update the backups in parallel each time the system is modified. This way, you will be able to access the latest saved data after an unexpected virus attack or system failure. By having the latest copies of important documents and projects, you will avoid serious inconveniences. File backups are especially useful if malware attacks your system unexpectedly. We recommend using the Data Recovery Pro program to restore the system.
