Remove AutoLocky (Improved Removal Guide)
AutoLocky Removal Guide
Description of AutoLocky
The number of viruses and other cyber threats increases every day, so it is no surprise that new AutoLocky virus was created and is now roaming the Internet in order to infect as many users’ devices as possible. AutoLocky virus is classified as ransomware, and its main aim is to receive payments for files, which were encrypted and locked by the virus. Although AutoLocky ransomware at first seems to be similar to well-known Locky virus, AutoLocky is not as sophisticated as Locky virus is. AutoLocky was programmed using AutoIt language this way making the virus easier to crack. Thus, the decryption tool was created fairly quickly.
AutoLocky – how does it work?
Soon after the virus reaches the user’s computer, it encrypts all the data using AES-128 encryption algorithm by affecting a number of various files, such as .doc, .txt, .xls, .docx, .doxm, .rar, .jpeg and many more. AutoLocky malware encrypts data by adding .locky extension to the file, and after this is done, you are unable to access or move the encrypted data. After the data is encrypted and all your files are inaccessible, cyber criminals offer a simple solution for this problem – if the user pays a certain amount of money, the files will be decrypted. The user is forced into paying the ransom for the data, which was infected with the virus by the same cyber criminals. In other words, they create the problem and then require payment for its resolution. The amount requested for the decryption of the files at this time is 0.75 Bitcoin, which is more or less 325 USD. We strongly recommend avoiding paying the ransom for the decryption of the files, no matter how important these records are.

While AutoLocky is encrypting data, two main things happen: first of all, there are two files created with the instructions how money should be transferred (Info.txt and Info.html). Secondly – the decryption keys are removed from the computer and sent to AutoLocky command and control servers. And the good news is – the encrypted files can be decrypted, without you having to pay the ransom. AutoLocky only uses Locky reputation to scare users into paying, but in reality, this virus can be removed, and files unlocked rather simply. You need to remove AutoLocky from the computer and then download AutoLocky decrypter to unlock encrypted files. However, it is important to remember, that AutoLocky removal has to be done before downloading the decryption tool. You can easily eliminate this virus using FortectIntego anti-malware.
How did my computer get infected?
Although the solution for the AutoLocky virus is already found, it is still unclear how the virus spreads. It is known that this virus usually reaches users hidden within PDF format file, thus it can be assumed, that AutoLocky spreads the same way any other ransomware does. Usually, these types of viruses are spread using spam emails from unknown email addresses or companies, and AutoLocky is not considered to be any different. Consequently, to prevent the virus infecting your computer, you need to avoid opening any emails from your Spam or Junk folders as well as opening or downloading the attachments sent by unknown company or individual. Instructions how to remove AutoLocky are provided on the next page.
Easy AutoLocky removal and decryption file guide
Although AutoLocky ransomware seems to be a very dangerous virus, computer experts managed to crack the virus code and create AutoLocky decrypter. Thus, users now can easily unlock their encrypted data without paying any money to cyber criminals. As it was mentioned before, it is crucial to remove AutoLocky and all its components from your computer before downloading the decryption tool. You can choose if you want to remove AutoLocky manually or automatically, using SpyHunter anti-malware software. The manual virus removal instructions are provided below. However, we strongly advise you to use anti-malware software for AutoLocky removal. After installing FortectIntego, you should run a full scan on your computer to remove all malicious files from your computer. After the AutoLocky malware is removed, you can download this decryption tool and safely recover the encrypted data.
Getting rid of AutoLocky. Follow these steps
In-depth guide for the AutoLocky elimination
Important! →
The elimination guide can appear too difficult if you are not tech-savvy. It requires some knowledge of computer processes since it includes system changes that need to be performed correctly. You need to take steps carefully and follow the guide avoiding any issues created due to improper setting changes. Automatic methods might suit you better if you find the guide too difficult.
Step 1. Launch Safe Mode with Networking
Safe Mode environment offers better results of manual virus removal
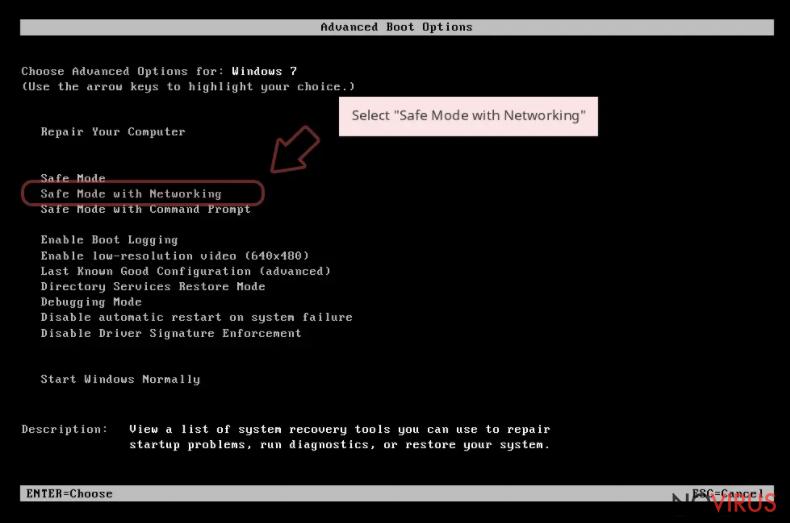
Windows 7 / Vista / XP
- Go to Start.
- Choose Shutdown, then Restart, and OK.
- When your computer boots, start pressing the F8 button (if that does not work, try F2, F12, Del, etc. – it all depends on your motherboard model) a few times until you see the Advanced Boot Options window.
- Select Safe Mode with Networking from the list.
Windows 10 / Windows 8
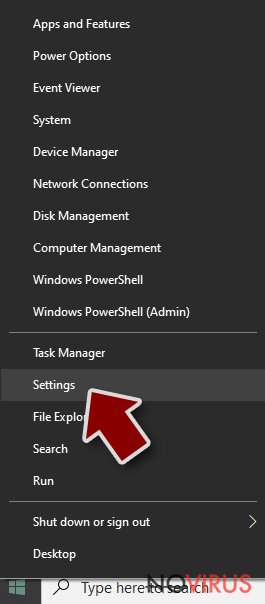
- Right-click the Start button and choose Settings.
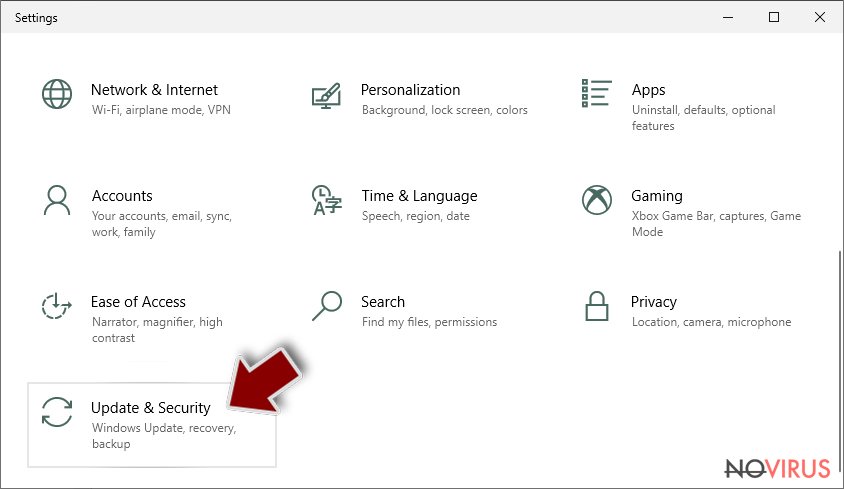
- Scroll down to find Update & Security.
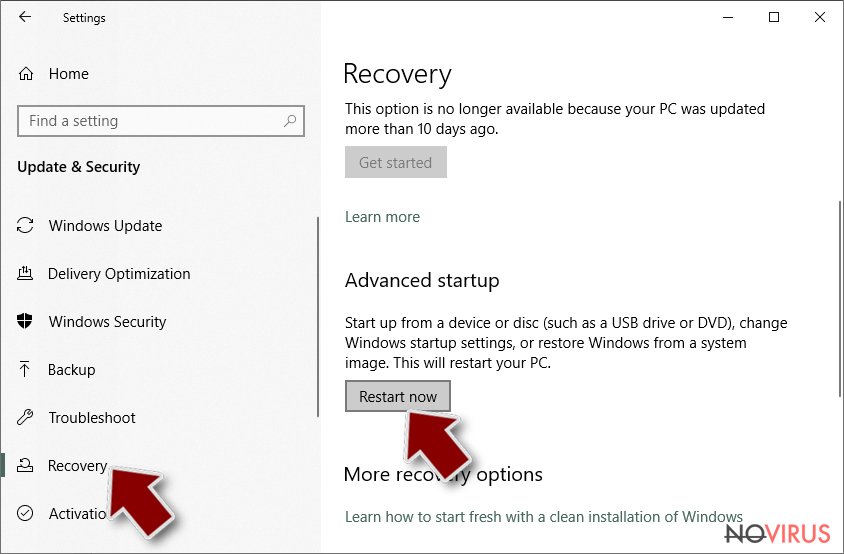
- On the left, pick Recovery.
- Scroll to find Advanced Startup section.
- Click Restart now.
- Choose Troubleshoot.
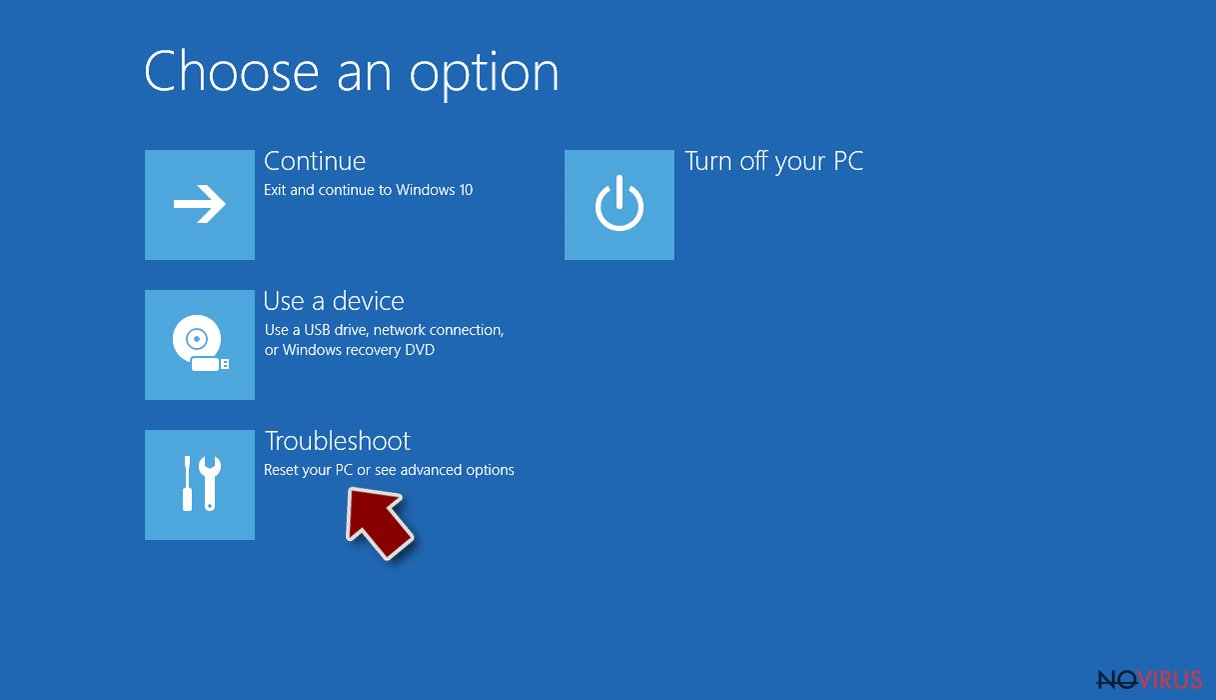
- Go to Advanced options.
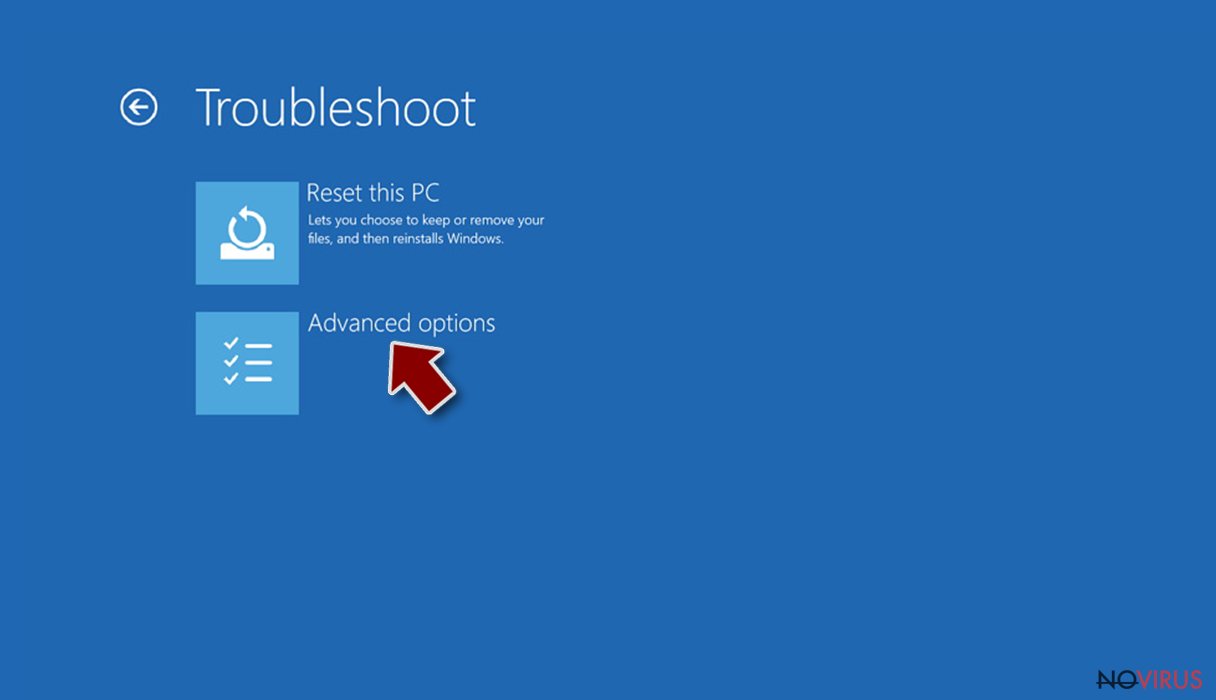
- Select Startup Settings.
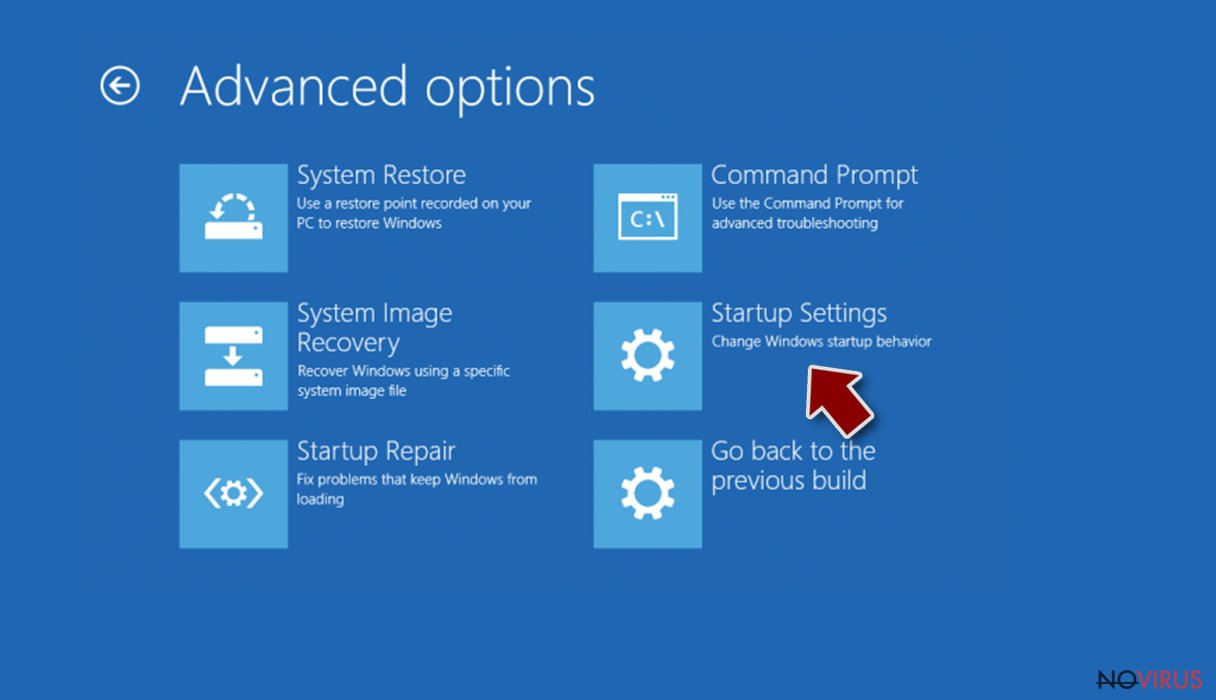
- Press Restart.
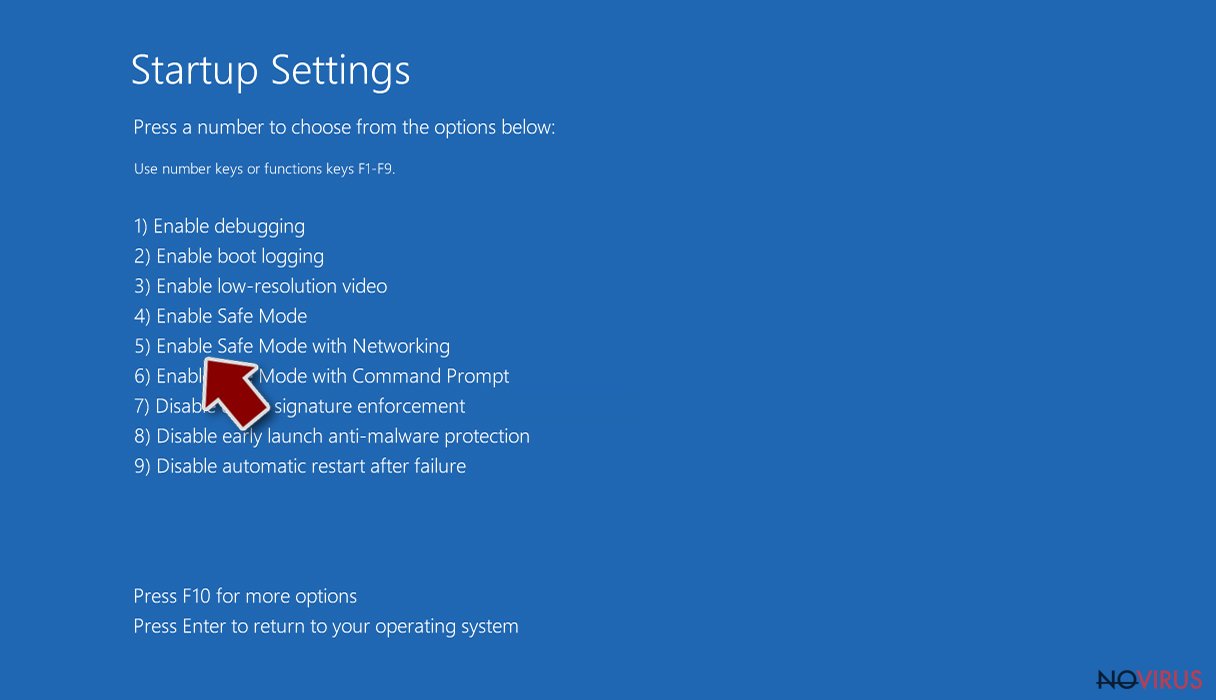
- Choose 5) Enable Safe Mode with Networking.
Step 2. End questionable processes
You can rely on Windows Task Manager that finds all the random processes in the background. When the intruder is triggering any processes, you can shut them down:
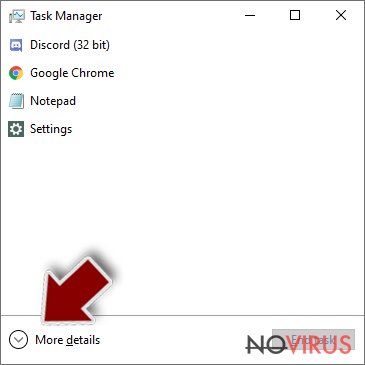
- Press Ctrl + Shift + Esc keys to open Windows Task Manager.
- Click on More details.
- Scroll down to Background processes.
- Look for anything suspicious.
- Right-click and select Open file location.
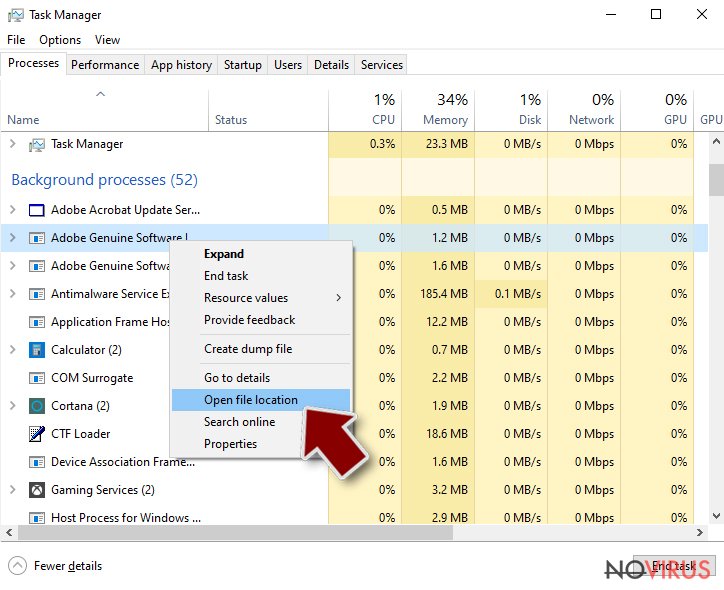
- Go back to the Process tab, right-click and pick End Task.
- Delete the contents of the malicious folder.
Step 3. Check the program in Startup
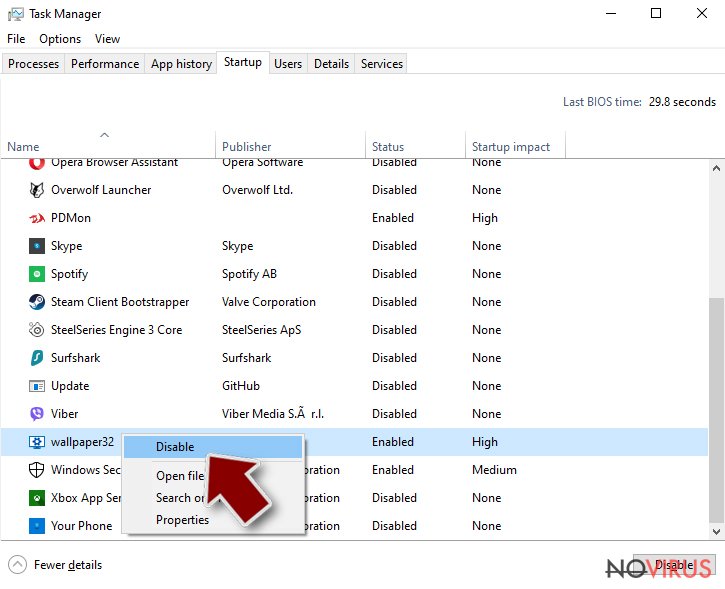
- Press Ctrl + Shift + Esc on your keyboard again.
- Go to the Startup tab.
- Right-click on the suspicious app and pick Disable.
Step 4. Find and eliminate virus files
Data related to the infection can be hidden in various places. Follow the steps and you can find them:
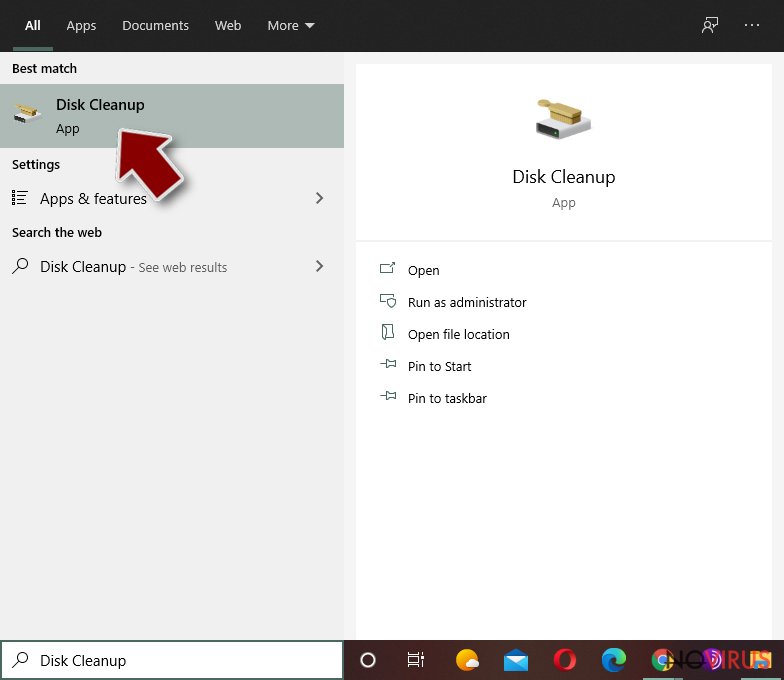
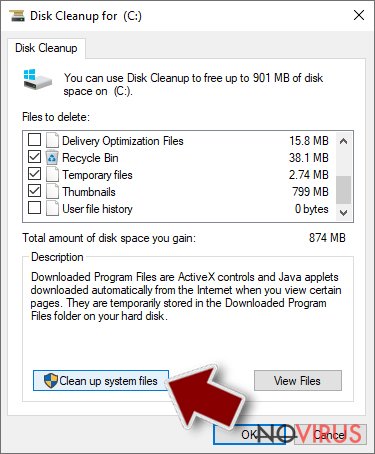
- Type in Disk Cleanup in Windows search and press Enter.
- Select the drive (C: is your main drive by default and is likely to be the one that has malicious files in) you want to clean.
- Scroll through the Files to delete and select the following:
Temporary Internet Files
Downloads
Recycle Bin
Temporary files - Pick Clean up system files.
- You can also look for other malicious files hidden in the following folders (type these entries in Windows Search and press Enter):
%AppData%
%LocalAppData%
%ProgramData%
%WinDir%
After you are finished, reboot the PC in normal mode.
Eliminate AutoLocky using System Restore
-
Step 1: Restart your computer in Safe Mode with Command Prompt
Windows 7 / Vista / XP- Go to Start → Shutdown → Restart → OK.
- As soon as your computer starts, start pressing F8 key repeatedly before the Windows logo shows up.
-
Choose Command Prompt from the list

Windows 10 / Windows 8- Click on the Power button at the Windows login screen, and then press and hold Shift key on your keyboard. Then click Restart.
- Then select Troubleshoot → Advanced options → Startup Settings and click Restart.
-
Once your computer starts, select Enable Safe Mode with Command Prompt from the list of options in Startup Settings.

-
Step 2: Perform a system restore to recover files and settings
-
When the Command Prompt window appears, type in cd restore and press Enter.

-
Then type rstrui.exe and hit Enter..

-
In a new window that shows up, click the Next button and choose a restore point that was created before the infiltration of AutoLocky and then click on the Next button again.


-
To start system restore, click Yes.

-
When the Command Prompt window appears, type in cd restore and press Enter.
It is strongly recommended to take precautions and secure your computer from malware attacks. To protect your PC from AutoLocky and other dangerous viruses, you should install and keep a powerful malware removal tool, for instance, FortectIntego, SpyHunter 5Combo Cleaner or Malwarebytes.
How to prevent from getting browser hijacker
A proper web browser and VPN tool can guarantee better safety
As online spying becomes an increasing problem, people are becoming more interested in how to protect their privacy. One way to increase your online security is to choose the most secure and private web browser. But if you want complete anonymity and security when surfing the web, you need Private Internet Access VPN service. This tool successfully reroutes traffic across different servers, so your IP address and location remain protected. It is also important that this tool is based on a strict no-log policy, so no data is collected and cannot be leaked or made available to first or third parties. If you want to feel safe on the internet, a combination of a secure web browser and a Private Internet Access VPN will help you.
Reduce the threat of viruses by backing up your data
Due to their own careless behavior, computer users can suffer various losses caused by cyber infections. Viruses can affect the functionality of the software or directly corrupt data on your system by encrypting it. These problems can disrupt the system and cause you to lose personal data permanently. There is no such threat if you have the latest backups, as you can easily recover lost data and get back to work.
It is recommended to update the backups in parallel each time the system is modified. This way, you will be able to access the latest saved data after an unexpected virus attack or system failure. By having the latest copies of important documents and projects, you will avoid serious inconveniences. File backups are especially useful if malware attacks your system unexpectedly. We recommend using the Data Recovery Pro program to restore the system.


