Uninstall Cerber 4.1.5 virus (Improved Removal Guide)
Cerber 4.1.5 virus Removal Guide
Description of Cerber 4.1.5 ransomware virus
Cerber has been updated on more time: Cerber 4.1.5 virus started spreading
Cerber 4.1.5 virus is another recently discovered update of the popular Cerber ransomware project. Not so long ago we have talked about Cerber 4.1.0, Cerber 4.1.1 and Cerber 4.1.4 variants. It seems that hackers do not want to leave innocent computer users alone and continue updating blackmailing and money swindling methods. However, the latest four versions barely differ from each other. The malware encrypts files using the same RSA and AES cryptography, changes affected computer’s background picture and drops the same README.hta file. The latter file includes ransom note which demands to pay 0.6967 Bitcoins in order to get back access to the personal records. Victims often decide to transfer the money because it seems the only data recovery solutions. Unfortunately, it may be true. Malware researchers haven’t created a free decryption tool yet. However, if you have data backups, you can restore personal files for free. Even though you don’t have them, you can still use additional methods and try to restore at least some of the most important documents. Besides, there’s always a possibility that free decryption tool will be released soon. Therefore, you can backup encrypted files and concentrate on Cerber 4.1.5 removal. Keep in mind that it’s a complex computer infection which should be taken seriously. Eliminate malware with the help of professional anti-malware programs such as FortectIntego or SpyHunter 5Combo Cleaner. Malware removal tools can find and delete all malicious components safely. We highly recommend not trying to remove Cerber 4.1.5 manually. You may leave some of malicious components or delete crucial files and damage your computer even more.

When Cerber 4.1.5 virus infiltrates the system, it starts looking for necessary files and encrypts them. Malware makes files useless by changing their names with random 10 characters string and appending 4 random characters extension. The last three Cerber’s variants behave in the same way. However, when data encryption is over, ransomware changes desktop’s picture with a ransom demanding message where it informs which version of malware affected the computer. The wallpaper also includes the link to a ‘personal payment’ website where users can learn more about purchasing Bitcoins and transferring them to the cyber criminals. Information related to the date decryption possibilities are presented in the ransom note called README.hta. Cerber 4.1.5 ransomware drops this file in all folders that have encrypted files. Once victims open this file, it launches a ‘Cerber Removal Instructions’ window. However, we do not recommend following these instructions no matter how important and valuable your files are. Cyber criminals may disappear after receiving your payment, or their offered decryption tool may be malicious. With decrypted files you may install additional malware. Besides, if you decide to pay once, hackers may think that you are willing to pay next time as well.
How does malware get inside computers?
Hackers spread Cerber 4.1.5 ransomware virus using two main techniques – malicious spam emails and PseudoDarkleech campaign. Using the first method hackers attach an infected Word document that includes Macro commands to an email. When users open the document and enable macros, the virus infiltrates the system. The second method allows spreading Cerber 4.1.5 ransomware via infected websites that have RIG exploit kit. When users visit this site, this tool starts scanning a computer and looking for vulnerabilities. When it finds some flaws in computer’s security or outdated programs, it uses them to install malware. You can reduce the risk of the ransomware attack if you double check the information about the sender before opening a suspicious email attachment, protect your computer with strong antivirus program and keep all your programs updated.
How to remove Cerber 4.1.5 and restore files?
Talking about malware removal and possibility to restore files, we have both good and bad news. Good news is that you can remove Cerber 4.1.5 from the computer with the help of FortectIntego or SpyHunter 5Combo Cleaner. Before installing, updating and scanning computer’s system, you should read the instructions presented below. Malware may prevent users from accessing antivirus or anti-malware tools. After Cerber 4.1.5 removal you can restore your files from data backups. However, it’s the only way to recover data safely. Of course, you can and you should try additional data recovery methods presented at the end of the article. Maybe you will retrieve at least some of your personal files.
Getting rid of Cerber 4.1.5 virus. Follow these steps
In-depth guide for the Cerber 4.1.5 elimination
Important! →
The elimination guide can appear too difficult if you are not tech-savvy. It requires some knowledge of computer processes since it includes system changes that need to be performed correctly. You need to take steps carefully and follow the guide avoiding any issues created due to improper setting changes. Automatic methods might suit you better if you find the guide too difficult.
Step 1. Launch Safe Mode with Networking
Safe Mode environment offers better results of manual virus removal
Windows 7 / Vista / XP
- Go to Start.
- Choose Shutdown, then Restart, and OK.
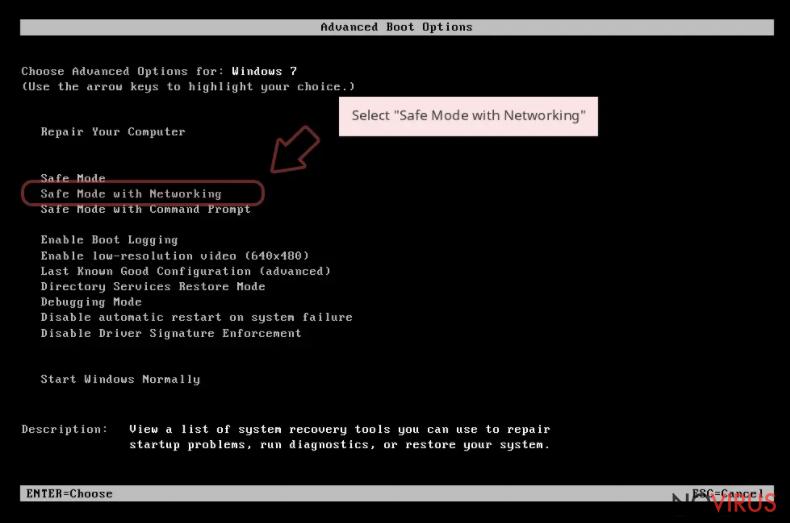
- When your computer boots, start pressing the F8 button (if that does not work, try F2, F12, Del, etc. – it all depends on your motherboard model) a few times until you see the Advanced Boot Options window.
- Select Safe Mode with Networking from the list.
Windows 10 / Windows 8
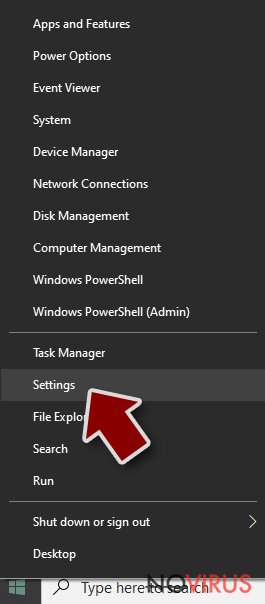
- Right-click the Start button and choose Settings.
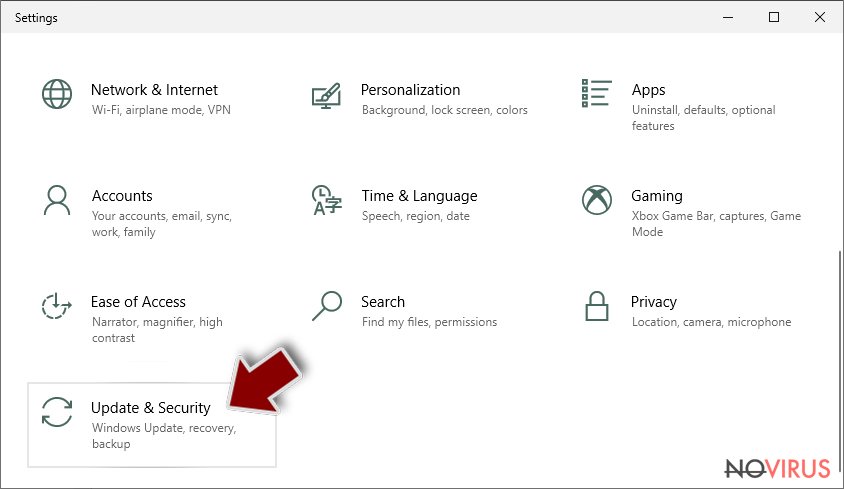
- Scroll down to find Update & Security.
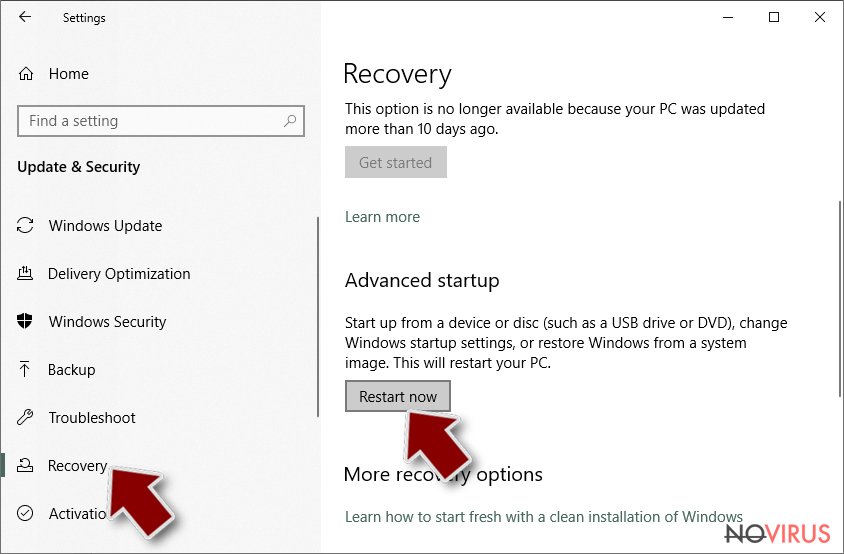
- On the left, pick Recovery.
- Scroll to find Advanced Startup section.
- Click Restart now.
- Choose Troubleshoot.
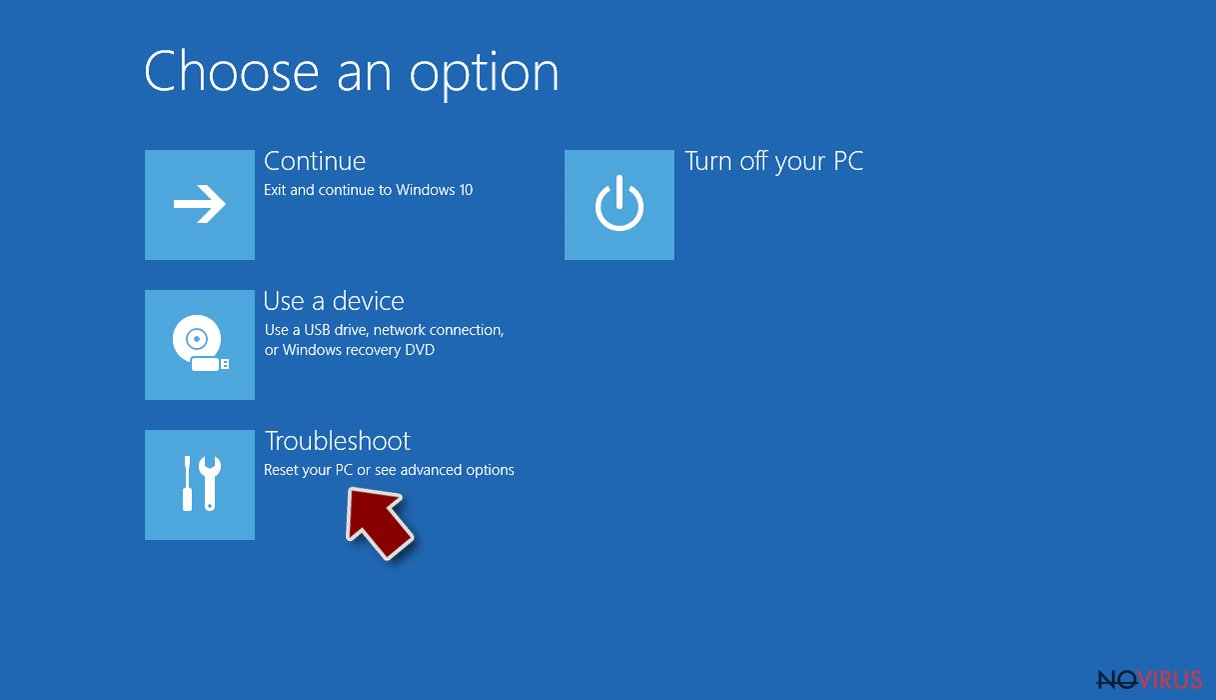
- Go to Advanced options.
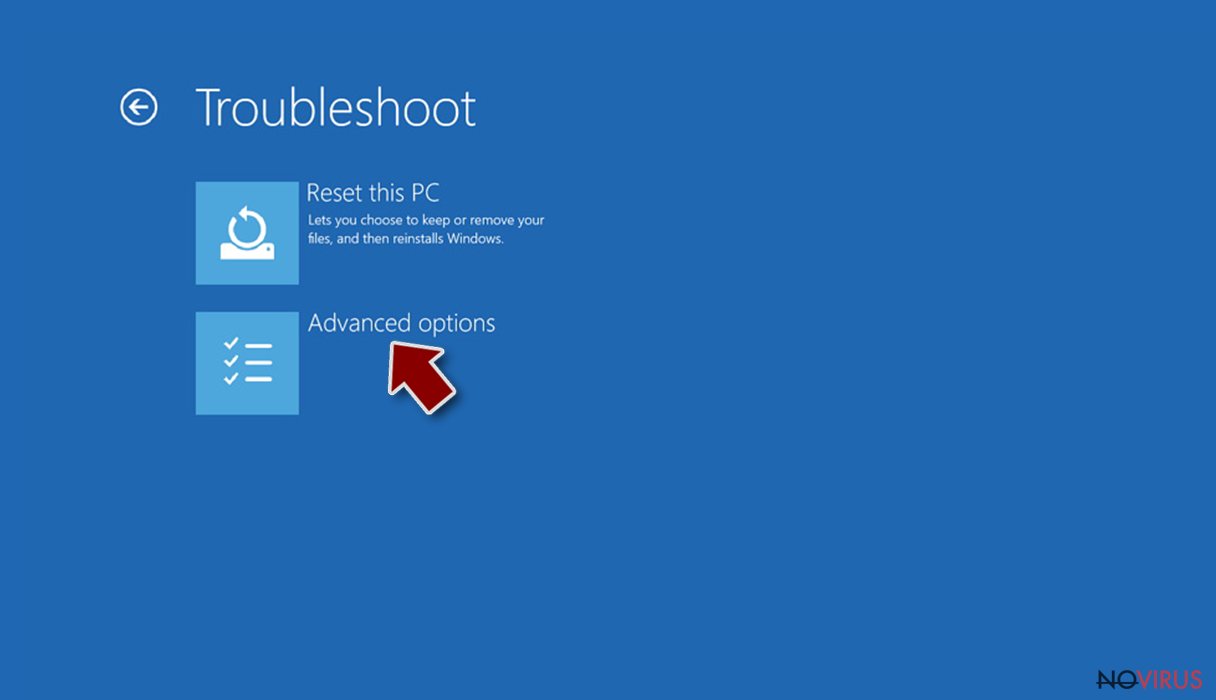
- Select Startup Settings.
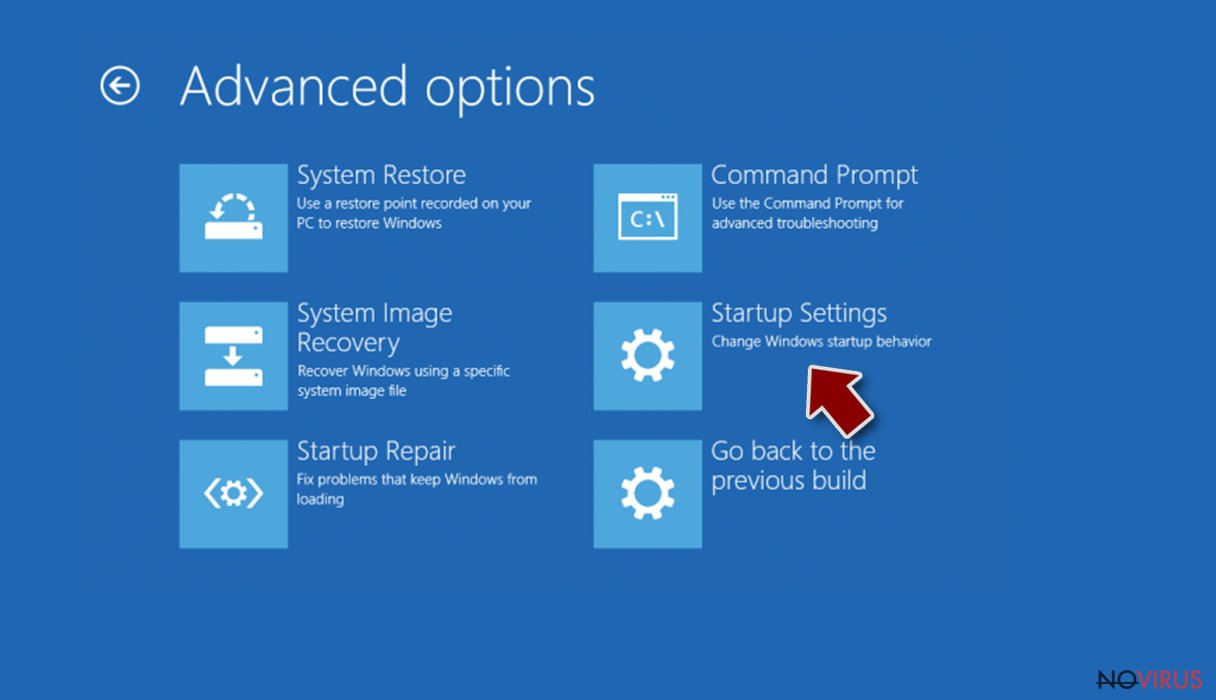
- Press Restart.
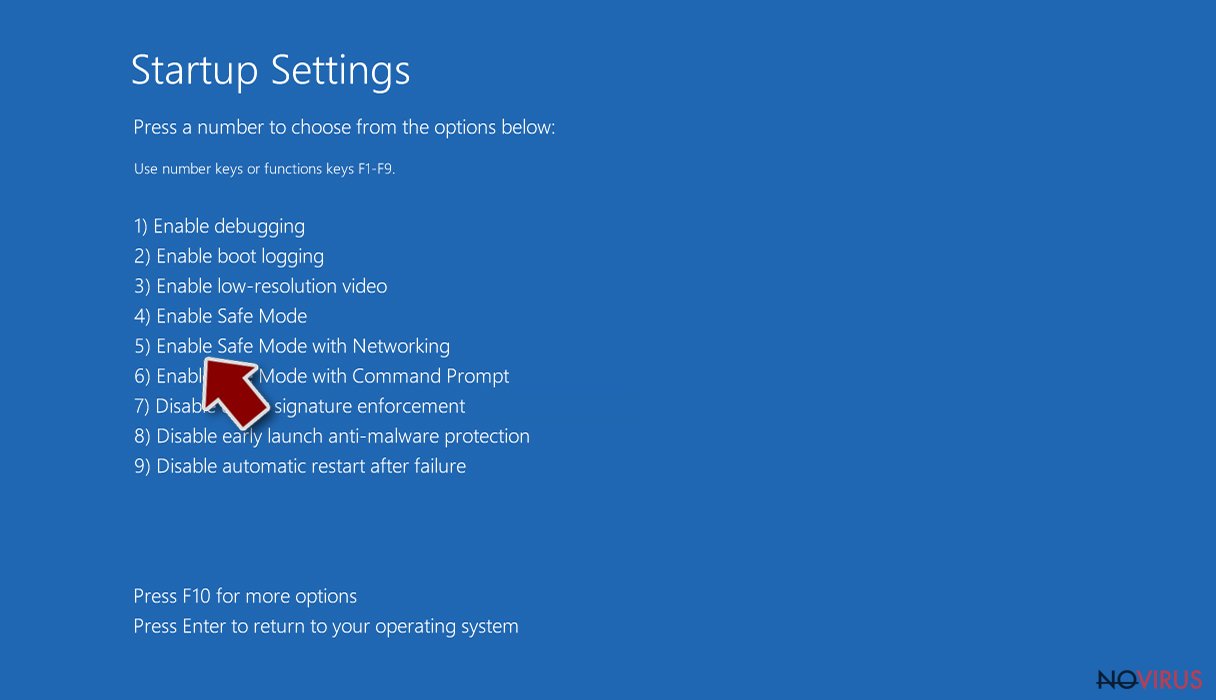
- Choose 5) Enable Safe Mode with Networking.
Step 2. End questionable processes
You can rely on Windows Task Manager that finds all the random processes in the background. When the intruder is triggering any processes, you can shut them down:
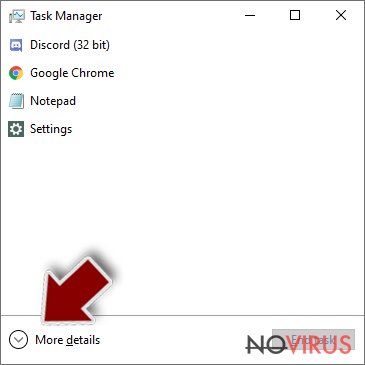
- Press Ctrl + Shift + Esc keys to open Windows Task Manager.
- Click on More details.
- Scroll down to Background processes.
- Look for anything suspicious.
- Right-click and select Open file location.
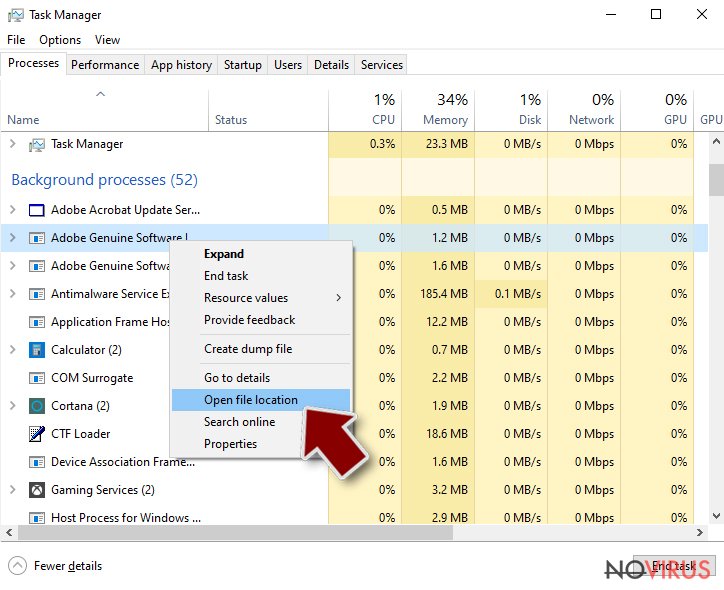
- Go back to the Process tab, right-click and pick End Task.
- Delete the contents of the malicious folder.
Step 3. Check the program in Startup
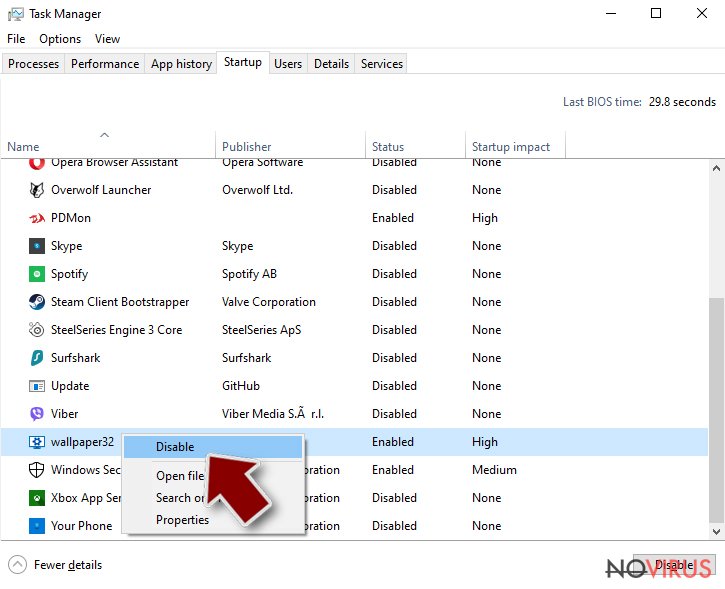
- Press Ctrl + Shift + Esc on your keyboard again.
- Go to the Startup tab.
- Right-click on the suspicious app and pick Disable.
Step 4. Find and eliminate virus files
Data related to the infection can be hidden in various places. Follow the steps and you can find them:
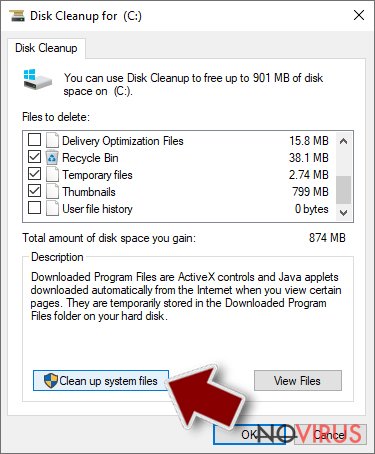
- Type in Disk Cleanup in Windows search and press Enter.
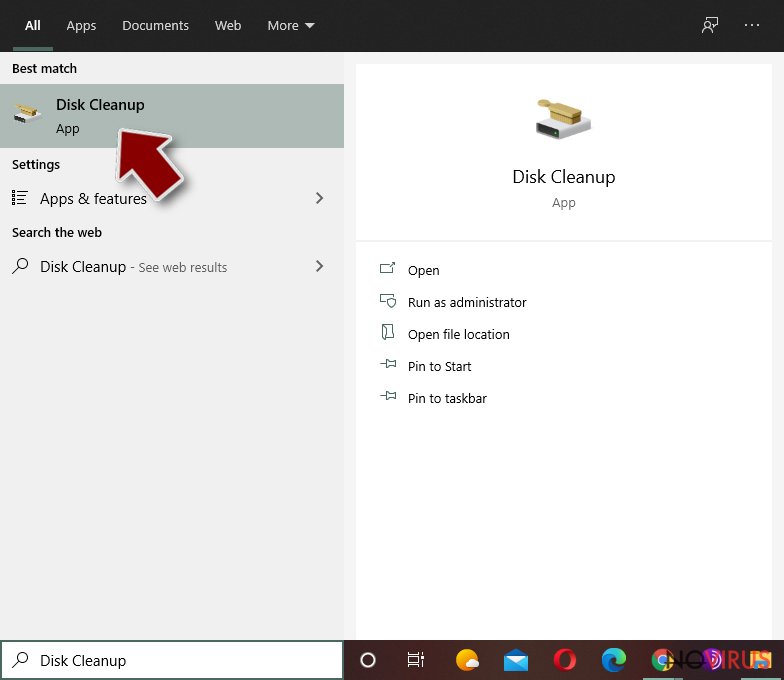
- Select the drive (C: is your main drive by default and is likely to be the one that has malicious files in) you want to clean.
- Scroll through the Files to delete and select the following:
Temporary Internet Files
Downloads
Recycle Bin
Temporary files - Pick Clean up system files.
- You can also look for other malicious files hidden in the following folders (type these entries in Windows Search and press Enter):
%AppData%
%LocalAppData%
%ProgramData%
%WinDir%
After you are finished, reboot the PC in normal mode.
Eliminate Cerber 4.1.5 using System Restore
-
Step 1: Restart your computer in Safe Mode with Command Prompt
Windows 7 / Vista / XP- Go to Start → Shutdown → Restart → OK.
- As soon as your computer starts, start pressing F8 key repeatedly before the Windows logo shows up.
-
Choose Command Prompt from the list

Windows 10 / Windows 8- Click on the Power button at the Windows login screen, and then press and hold Shift key on your keyboard. Then click Restart.
- Then select Troubleshoot → Advanced options → Startup Settings and click Restart.
-
Once your computer starts, select Enable Safe Mode with Command Prompt from the list of options in Startup Settings.

-
Step 2: Perform a system restore to recover files and settings
-
When the Command Prompt window appears, type in cd restore and press Enter.

-
Then type rstrui.exe and hit Enter..

-
In a new window that shows up, click the Next button and choose a restore point that was created before the infiltration of Cerber 4.1.5 and then click on the Next button again.


-
To start system restore, click Yes.

-
When the Command Prompt window appears, type in cd restore and press Enter.
Bonus: Restore your files
Using the tutorial provided above you should be able to eliminate Cerber 4.1.5 from the infected device. novirus.uk team has also prepared an in-depth data recovery guide which you will also find above.Paying the ransom may seem like the only data recovery solution. However, before risking your money, try additional methods that may help to restore your files.
There are a couple of methods you can apply to recover data encrypted by Cerber 4.1.5:
Restore lost files with the help of Data Recovery Pro
This tool has been created to fix corrupted or lost files. However, there’s a possibility that this tool may restore some of the encrypted files as well.
- Download Data Recovery Pro;
- Install Data Recovery on your computer following the steps indicated in the software’s Setup;
- Run the program to scan your device for the data encrypted by Cerber 4.1.5 ransomware;
- Recover the data.
Take advantage of Windows Previous Versions
You can try to restore individual files using this method only then System Restore feature has been enabled on your PC before ransomware attack.
- Right-click on the encrypted document you want to recover;
- Click “Properties” and navigate to “Previous versions” tab;
- In the “Folder versions” section look for the available file copies. Choose the desired version and press “Restore”.
It is strongly recommended to take precautions and secure your computer from malware attacks. To protect your PC from Cerber 4.1.5 and other dangerous viruses, you should install and keep a powerful malware removal tool, for instance, FortectIntego, SpyHunter 5Combo Cleaner or Malwarebytes.
How to prevent from getting ransomware
Securely connect to your website wherever you are
Sometimes you may need to log in to a content management system or server more often, especially if you are actively working on a blog, website, or different project that needs constant maintenance or that requires frequent content updates or other changes. Avoiding this problem can be easy if you choose a dedicated/fixed IP address. It's a static IP address that only belongs to a specific device and does not change when you are in different locations.
VPN service providers such as Private Internet Access can help you with these settings. This tool can help you control your online reputation and successfully manage your projects wherever you are. It is important to prevent different IP addresses from connecting to your website. With a dedicated/fixed IP address, VPN service, and secure access to a content management system, your project will remain secure.
Reduce the threat of viruses by backing up your data
Due to their own careless behavior, computer users can suffer various losses caused by cyber infections. Viruses can affect the functionality of the software or directly corrupt data on your system by encrypting it. These problems can disrupt the system and cause you to lose personal data permanently. There is no such threat if you have the latest backups, as you can easily recover lost data and get back to work.
It is recommended to update the backups in parallel each time the system is modified. This way, you will be able to access the latest saved data after an unexpected virus attack or system failure. By having the latest copies of important documents and projects, you will avoid serious inconveniences. File backups are especially useful if malware attacks your system unexpectedly. We recommend using the Data Recovery Pro program to restore the system.


